

21R2.0 Functionality Guide
The Functionality Guide is intended for Sales Operations, Business Administrators, System Integrators, and others responsible for making decisions about what features are needed for end users to be successful and deciding which features work together with existing customer configurations.
Information includes an overview of each feature, examples, screen shots, and targeted information on how to use each feature. Select the heading link to display the topic which includes configuration instructions, if applicable.
General
Veeva CRM Standard Metrics
Veeva CRM has standard metrics for call channel, user type, and user country data. Standardizing a set list of picklist values allows Veeva to capture better insights through benchmarks built on consistent data across companies. It also allows customers to do the following:
- Normalize data for comparison across therapeutic areas and orgs within their company for faster insights
- Enable downstream innovation and CRM functionality, such as integrated HCP scheduling, channel preferences, and country-specific logic through a consistent set of values
- Gather metrics and set benchmarks
Standard values are set for the following fields:
- Call_Channel_vod on the Call2_vod object
- Country_Code_vod on the User object
- User_Type_vod on the User object
The following features are now available:
- Selecting a Call Channel - By default, users are required to manually select a call channel for each call report they create
- Auto-Populating the Call Channel - Admins can configure the Standard Metrics Call Channel field to auto-populate based on existing custom fields
- Restricting Call Channels - Admins can disable unapproved call channels (Email, Chat or Text, Other) from the Standard Metrics Call Channel picklist
- Requiring User Type and Country - To provide customers with improved data and insights, better benchmarking ability, and access to downstream innovations, Veeva CRM users are prompted for User Type and Country information when signing in if those values were not data loaded or specified by the org’s admin
Standard Metrics Fields
- Call_Channel_vod field on the Call2_vod object – standard field on the call report that requires end users to select one of six options to submit a call:
- In-person – previously Face-to-Face
- Phone
- Video
- Chat or Text – previously Message
-
Other
See Selecting the Call Channel for important information about platforms and configuring call channel selection.
Picklist values for the Call Channel picklist value set were updated. Any Veeva values that were removed or modified were restored. The description was also updated.
- User_Type_vod - field on the User record that indicates the role of the end user. Customers should data load this information with a standard picklist value. See the User Types for CRM Standard Metrics section for more information on user types.
- Sales
- Medical
- Key Account Manager
-
Operations and Admin
-
Country_Code_vod – field on the User record set by the administrator indicating the end user’s primary country of operations. Available picklist values follow the 2-letter ISO code standard. Customers should data load this information.
Picklist values for the Country Code picklist value set were updated. Any Veeva values that were removed or modified were restored. The description was also updated.
See Stamping Country Information for Account and User and Requiring User Type and Country for more information.
All three fields (Call_Channel_vod, User_Type_vod, and Country_Code_vod) are optional in 21R2 (August ‘21) and mandatory in 22R1 (April ’22). The standard Call_Channel_vod and Call_Type_vod fields are not removed. Also, existing custom call channel or call type fields are not removed.
In 22R1, the Call_Channel_vod field is automatically exposed and required on every call report. Each user is prompted once to enter their user type and country of operation if a value was not defined.
User Types for CRM Standard Metrics
Veeva CRM Standard Metrics employs the following user types.
|
Picklist Value |
Category Definition |
Examples |
|---|---|---|
|
Sales |
Field-based, hybrid, or virtual users whose primary job function is recording the details of a call intended for promotional purposes. These users target individual prescribers, nurses, administrators, and other clinician customers. |
|
|
Medical |
Field medical, home-office medical, and medically trained professional users (typically with scientific credentials) recording interactions with the sole purpose of scientific engagement and not for promotional measures. |
|
|
Key Account Manager |
Users who record the details of a call with stakeholders in accounts primarily focused on influencing the decision making at the account or institutional level as opposed to an individual clinician. |
|
|
Operation & Admin |
Users who manage system configuration or use the system primarily for reporting or administrative purposes. |
|
Account Management
Stakeholder Navigator
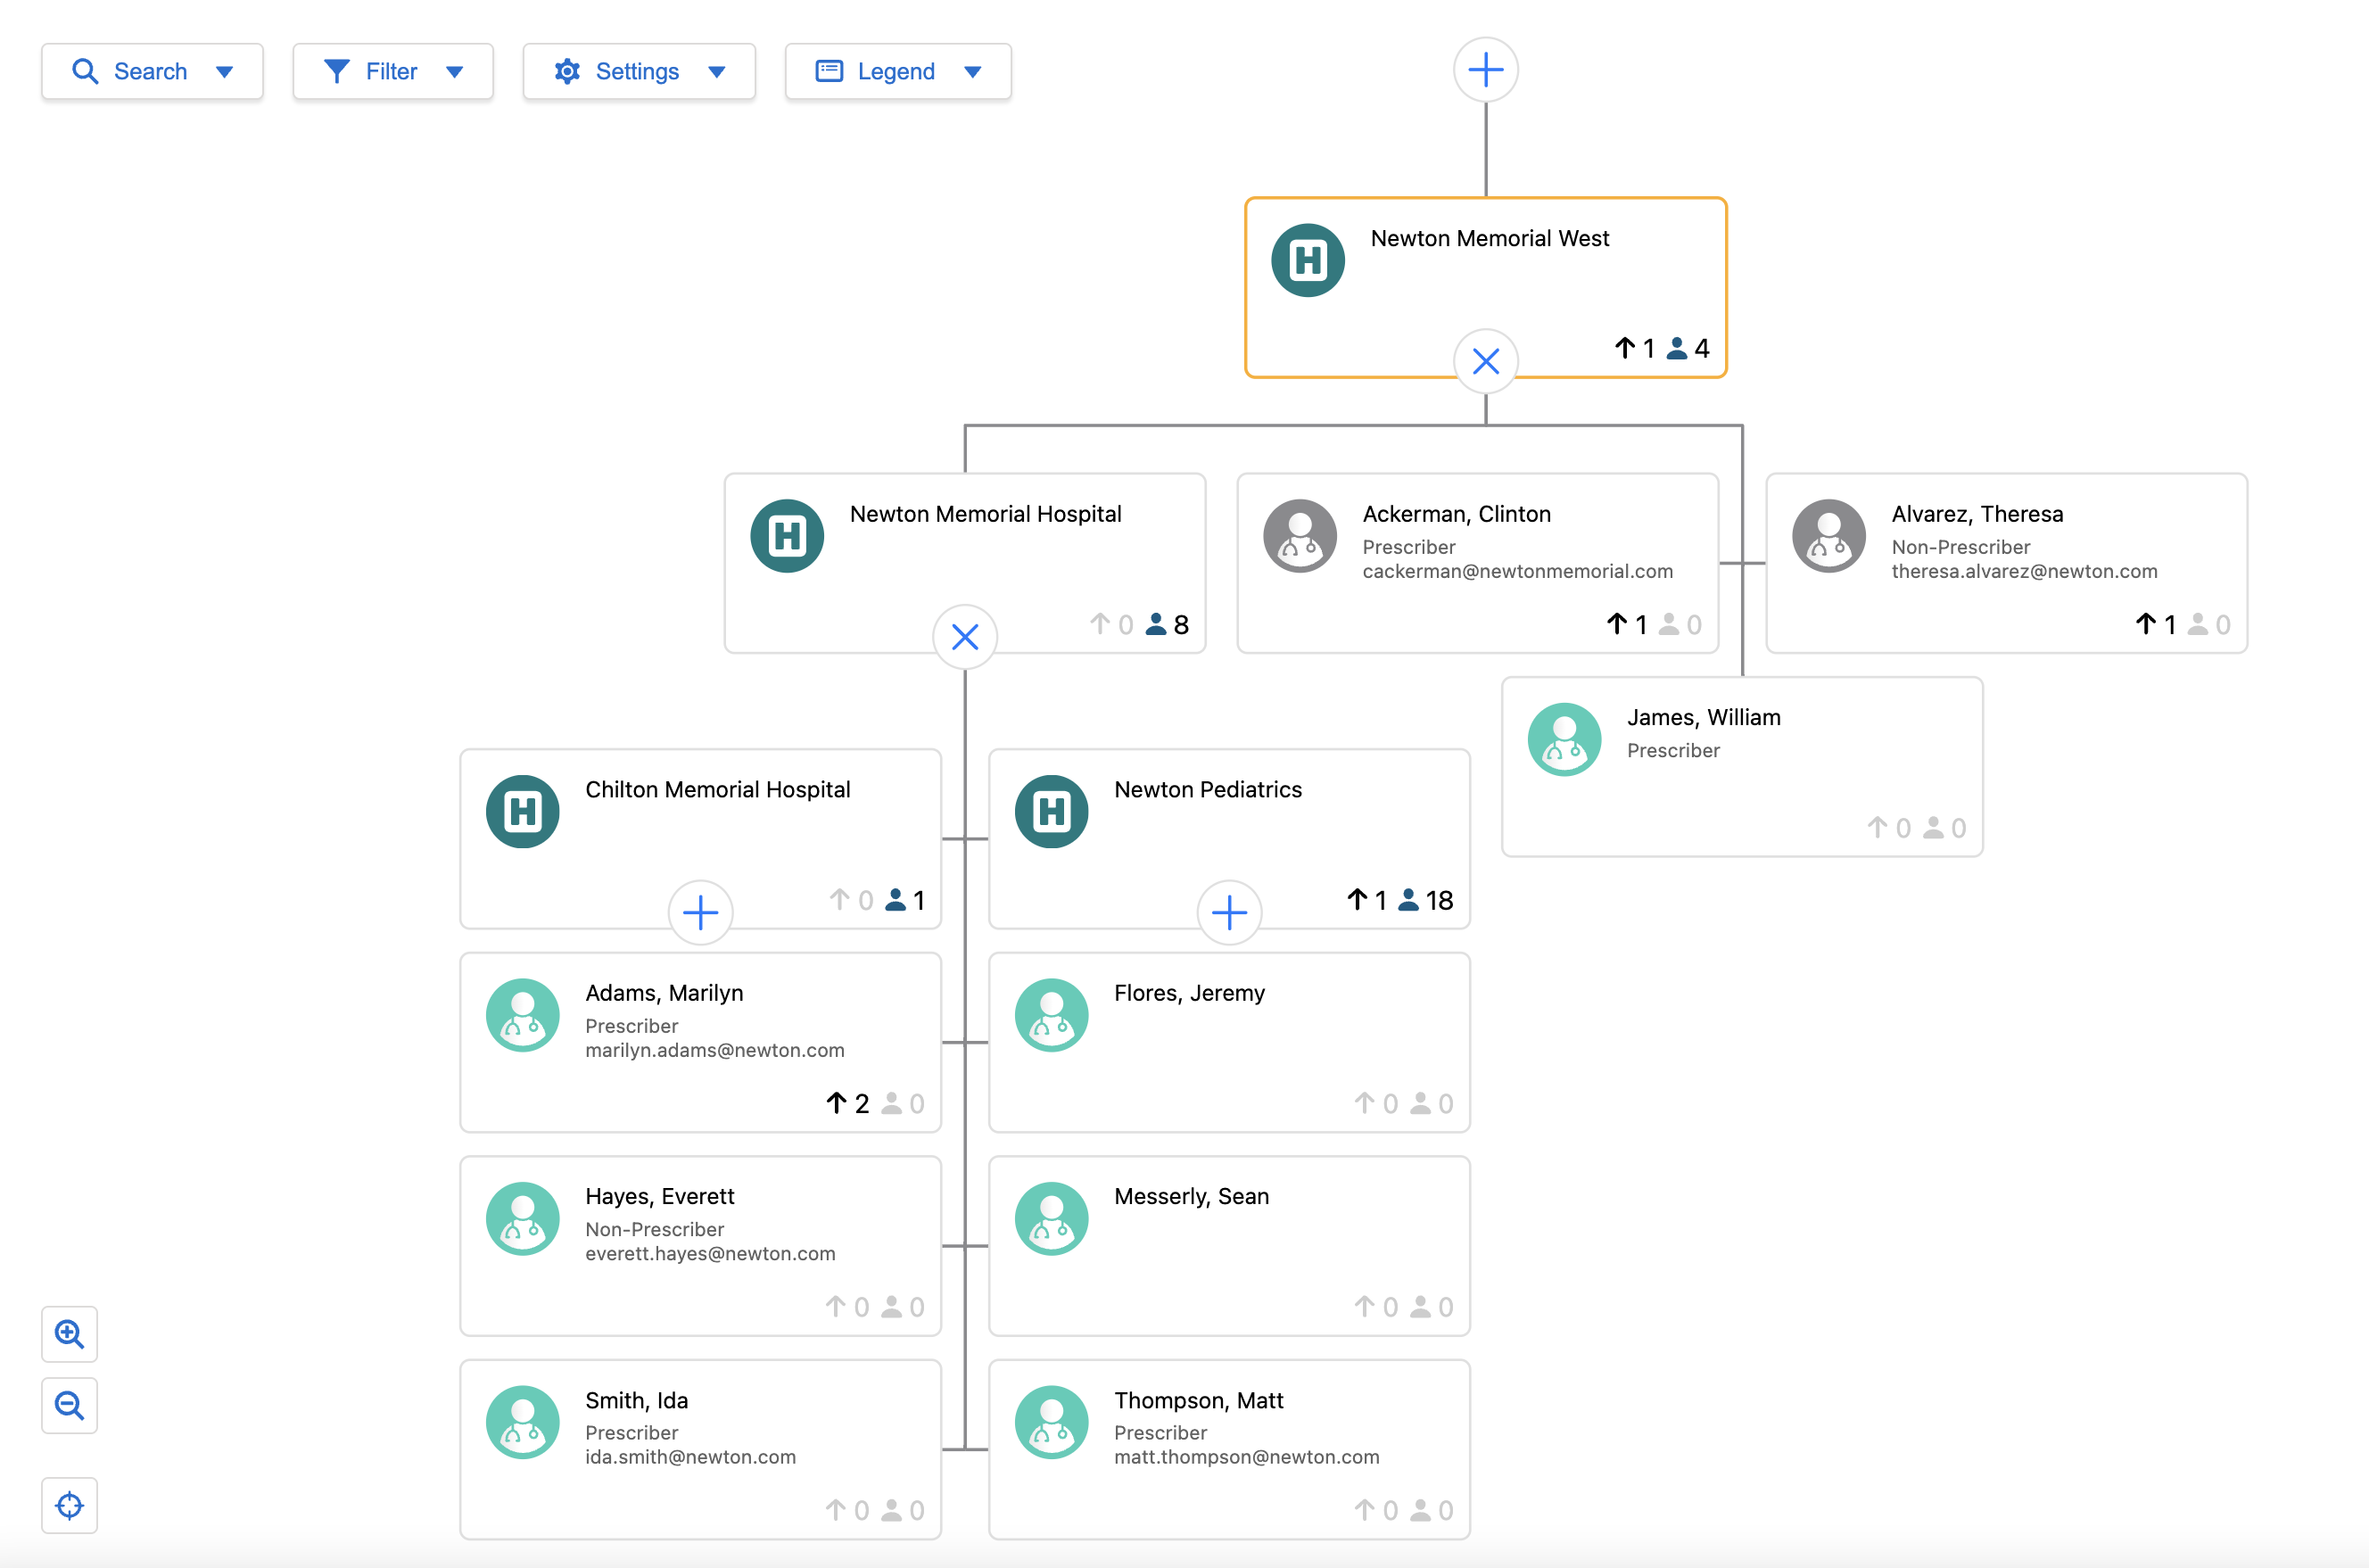
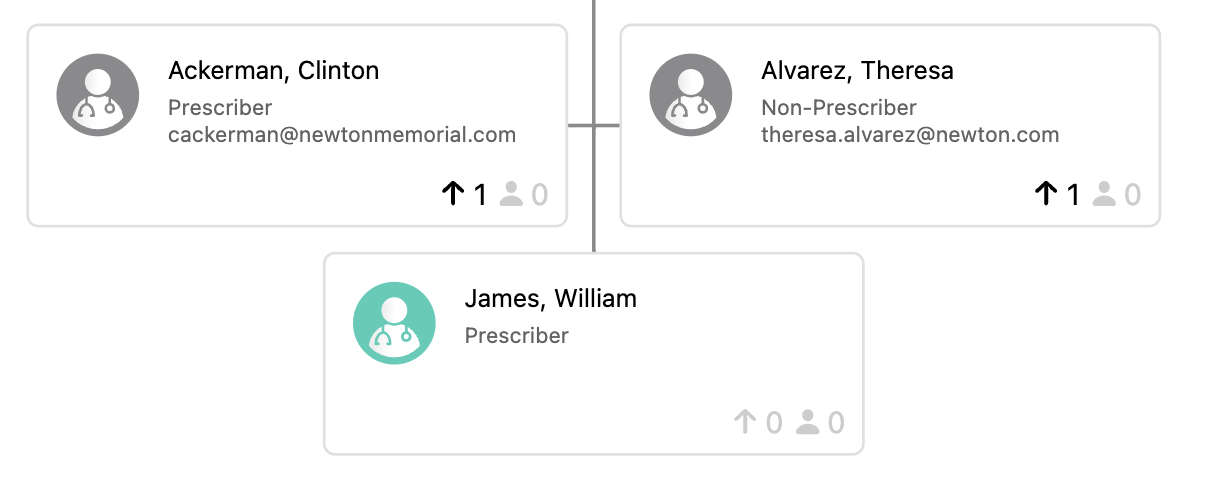
For example, Sarah Jones is a Key Account Manager (KAM) with a new key account to cover. She uses the Stakeholder Navigator to get an idea of who the key stakeholders are within the account, and what relationships they have to other people in the organization, so she can use that information to understand who to target as a part of the account plan.
Using the Stakeholder Navigator
To view the Stakeholder Navigator, select the Stakeholder Navigator button on an account or an account plan. The account Stakeholder Navigator is launched from is the root account. If the root account is a parent account, users can expand the hierarchy to display child accounts.
Exploring the Stakeholder Navigator
Using the set of buttons on the left of the Stakeholder Navigator, users can do the following:
- Display Full Hierarchy
- Zoom In (online only)
- Zoom Out (online only)


Users can zoom in and out on iOS devices using pinch-to-zoom. The buttons do not display in iOS devices.
Users can also drag the hierarchy on the screen to focus on a particular section.
Loading the Hierarchy
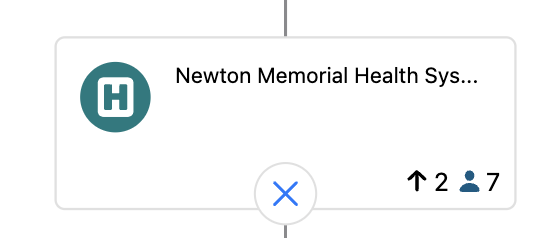
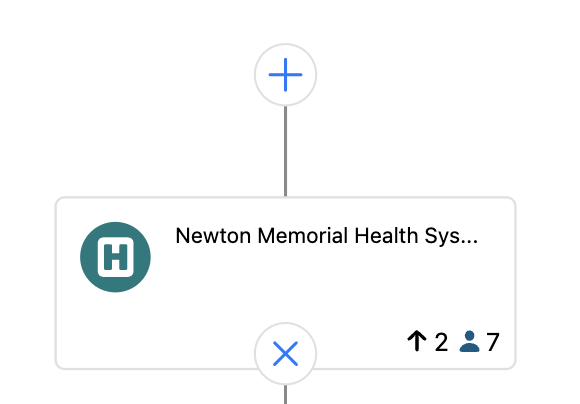
To enhance performance, either one or two levels of the hierarchy load by default on the Stakeholder Navigator. Each level displays the child accounts for a parent account in the hierarchy. For example, if Newton Memorial Health is the root account, or the account from which the Stakeholder Navigator was opened, and has four child accounts, those four accounts are the first level. The child accounts of the first level comprise the second level of accounts.
- For parent accounts with fewer than 500 child accounts, two levels of child accounts load
- For parent accounts with more than 500 child accounts, the first level of child accounts loads. Users can open more levels as needed.
If a child account has more than one parent account, Stakeholder Navigator displays the primary parent. If no primary parent is designated, Stakeholder Navigator displays the parent whose name is first alphabetically.
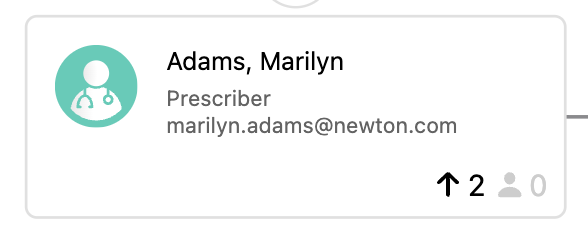
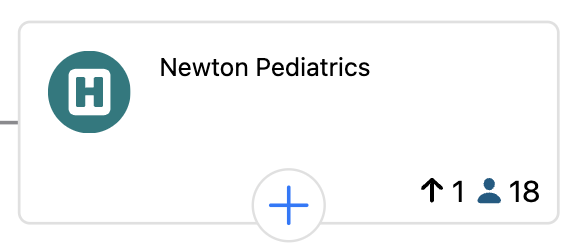
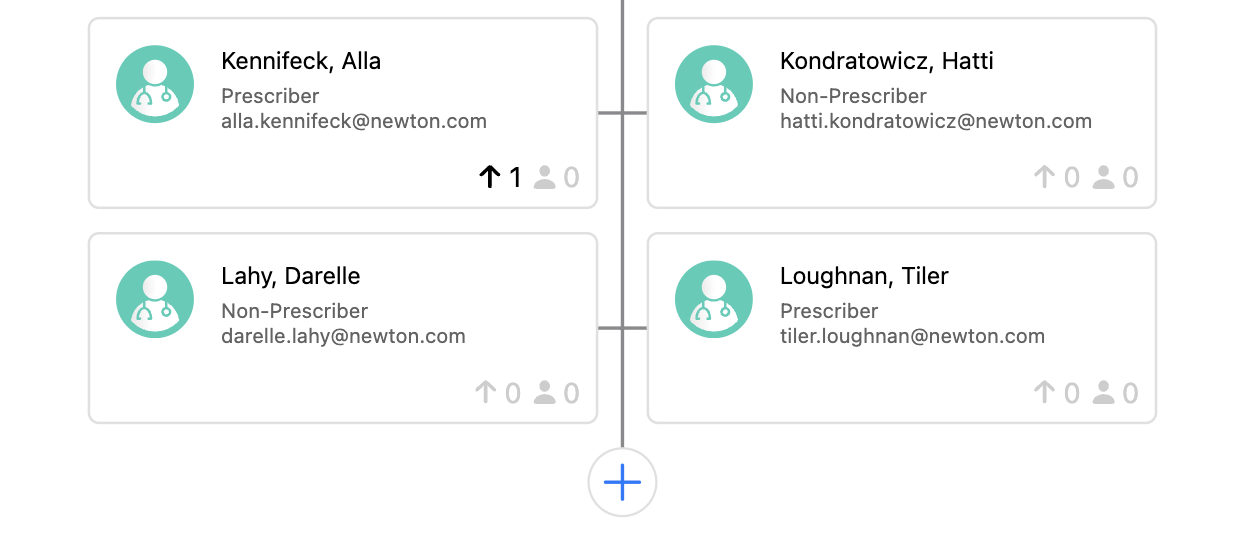
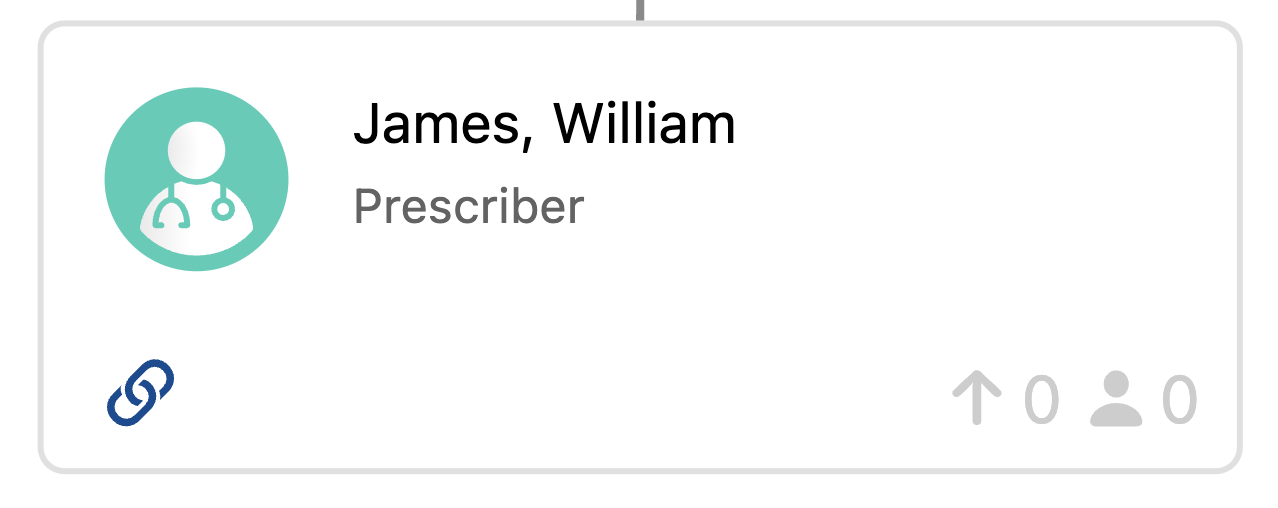
Account Cards
Each account card in the Stakeholder Navigator displays the record type icon and the name of the account. Account Identifiers are also shown and can be customized. The number of affiliations and child accounts are shown on the bottom right corner.
- Expand - A plus button displays on account cards when there are unloaded children that can be shown in the hierarchy.
- Collapse - An X button displays on account cards when there are child accounts that can be collapsed.
- Show More - A plus button is also used to indicate that more child accounts are available to display for a parent account. The first ten child accounts display initially, and selecting the plus button shows up to ten more child accounts at a time.
- Load Parent Accounts - A plus button above the root of the hierarchy indicates that the root account has an unloaded parent account. Selecting the plus button loads the root’s parent and sibling accounts.
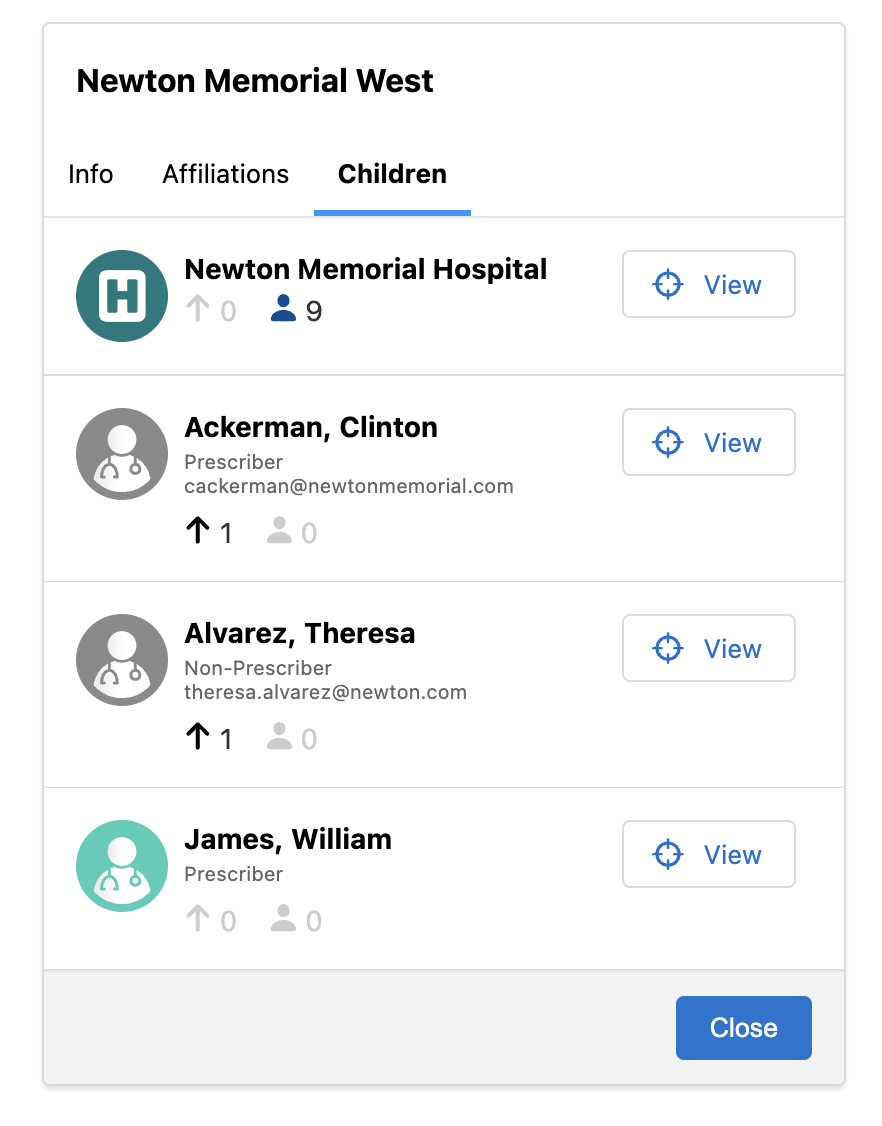
Account Modal
When a user selects an account card in the hierarchy an account modal appears with 3 tabs.
- Info - This tab displays information relevant to the selected account. The displayed fields can be customized. The user can also navigate to the account’s detail page and timeline as well as create new affiliations.
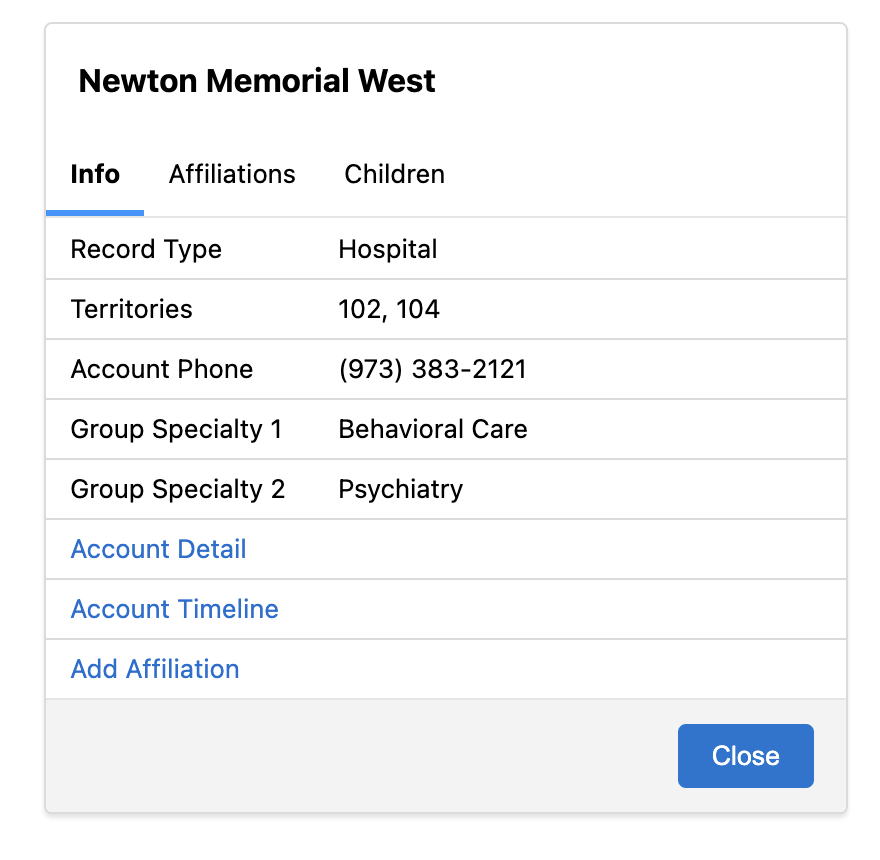
- Affiliations - This tab displays affiliation tiles containing account name, account identifiers, and affiliation influence. Selecting the “View” button centers the hierarchy on the affiliated account. Selecting affiliation tiles reveals more affiliation information and actions.

- Children - This tab displays child tiles containing account name, account identifiers. Selecting the “View” button centers the hierarchy on the child account. Selecting on child tiles reveals more account information and actions.
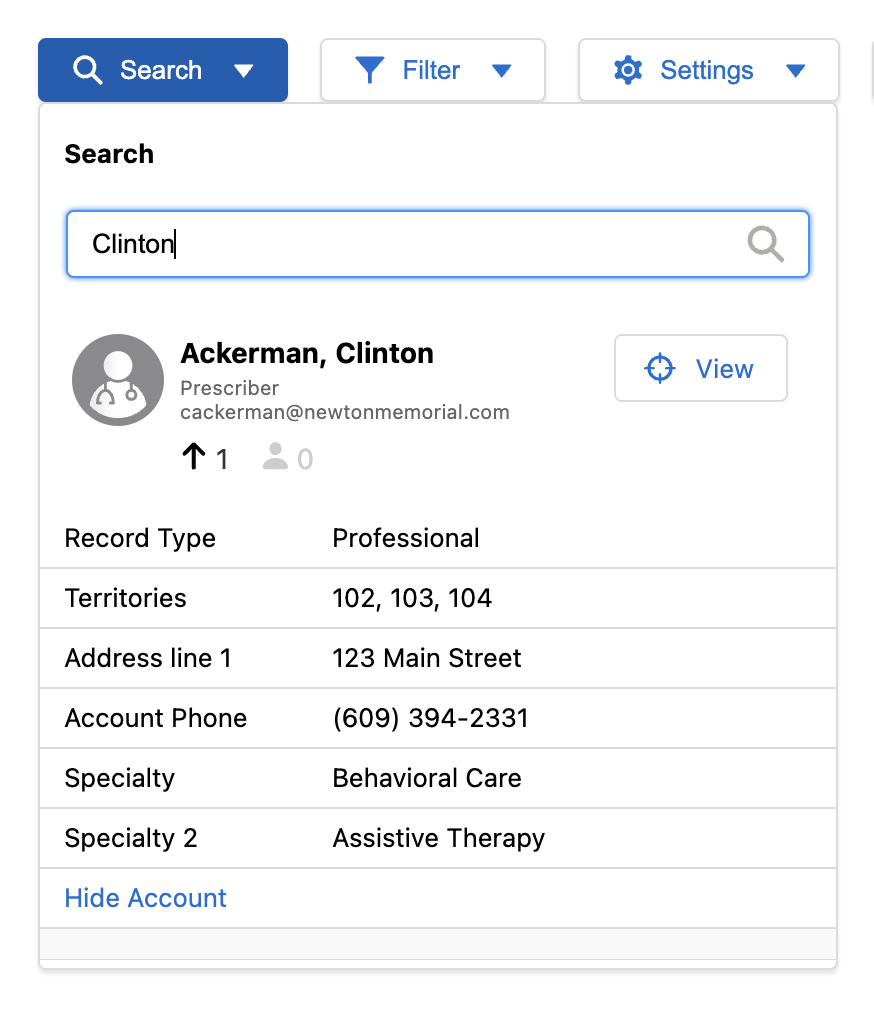
Searching Accounts
The search button located in the top left of the hierarchy allows users to find information for accounts loaded into the Stakeholder Navigator and that are not otherwise filtered out. Enter the desired keywords — for example, enter Clinton to find Clinton Ackerman’s account. Selecting search result tiles reveals more account information and actions.
Filtering Accounts
The filter button located in the top left of the hierarchy allows users to filter accounts and affiliation based on chosen criteria. Users can select check boxes to always display Key Stakeholders and to only show accounts that have affiliations. Accounts can also be refined by specialty or by territory. In the Affiliation Filters section, users can refine affiliations by relationship strength, role, and therapeutic area. Users can also specify that only affiliations with influence should display.
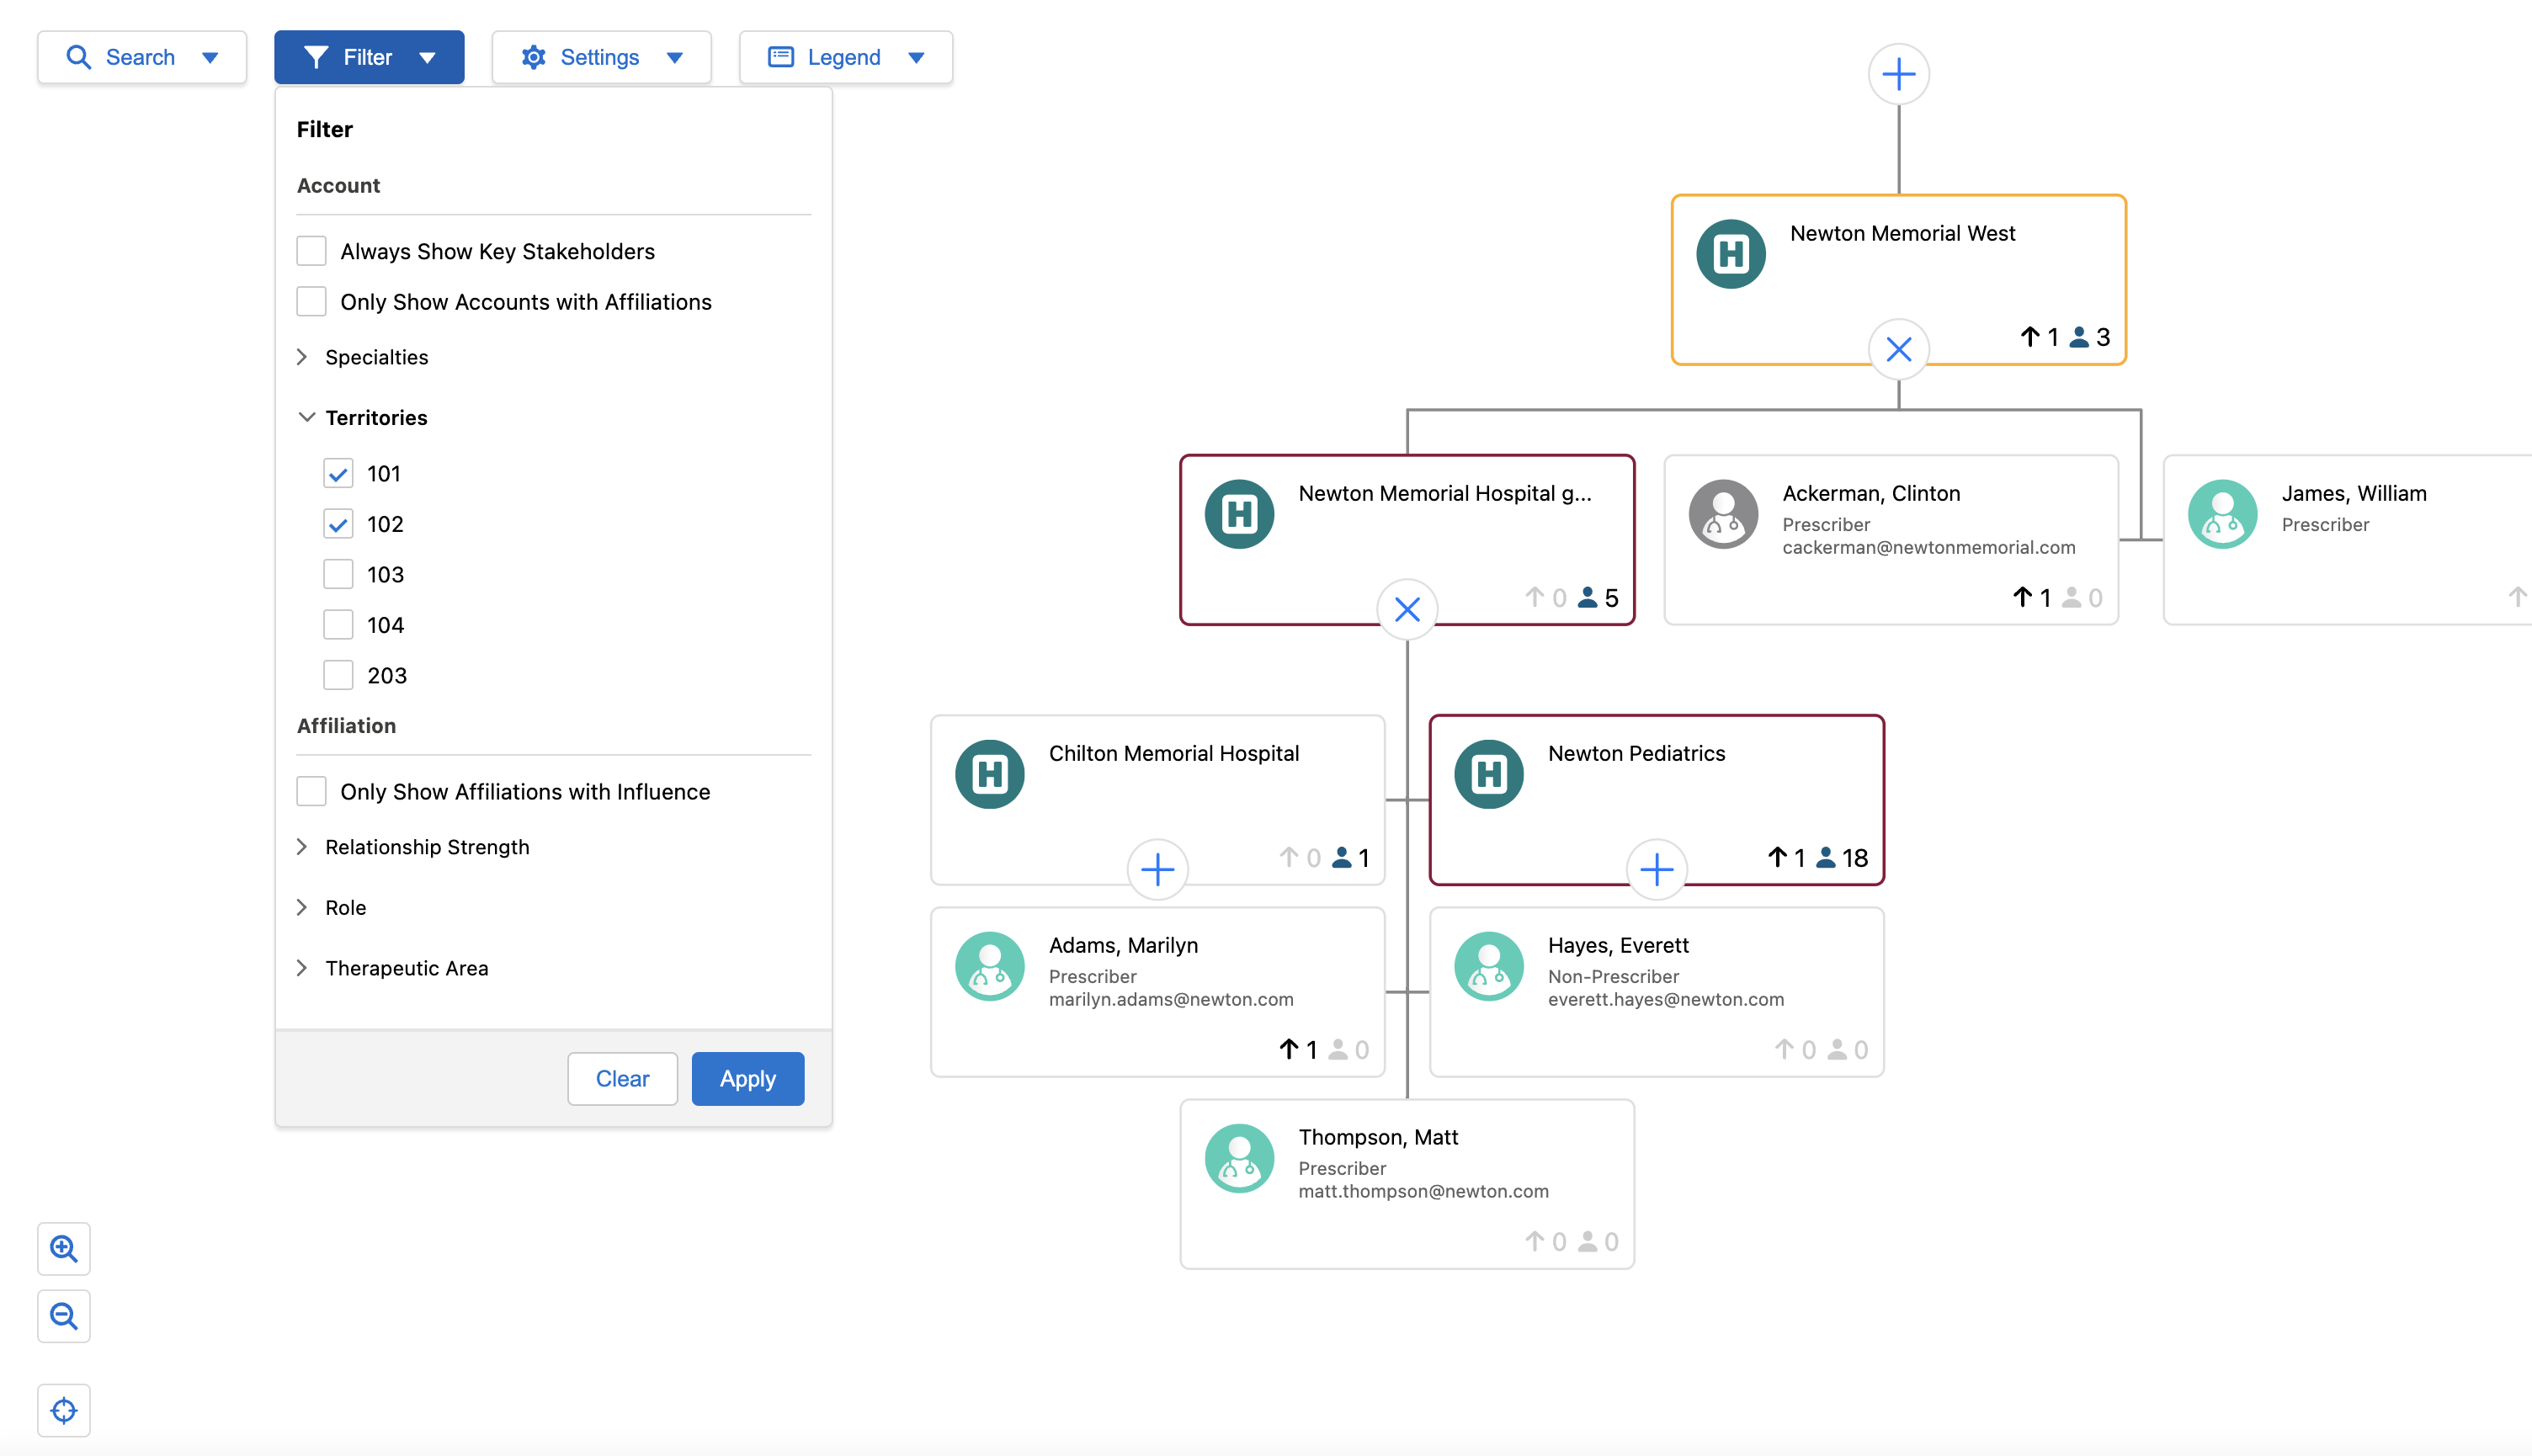
When a filter is applied, all accounts meeting the criteria display along with any accounts that must display for the Stakeholder Navigator to show a link to the root account. For example, if an HCP account meets a user’s filtering criteria but its parent accounts do not, the parent accounts display to show the path from the HCP account to the root account.
The options in the Specialty filter are generated based on the following fields from the accounts displayed in Stakeholder Navigator:
- Specialty_1_vod__c
- Group_Specialty_1_vod__c
- Specialty_2_vod__c
- Group_Specialty_2_vod__c
Specialty filter values display even if the picklist value for the field is set to Inactive.
Toggling Affiliations
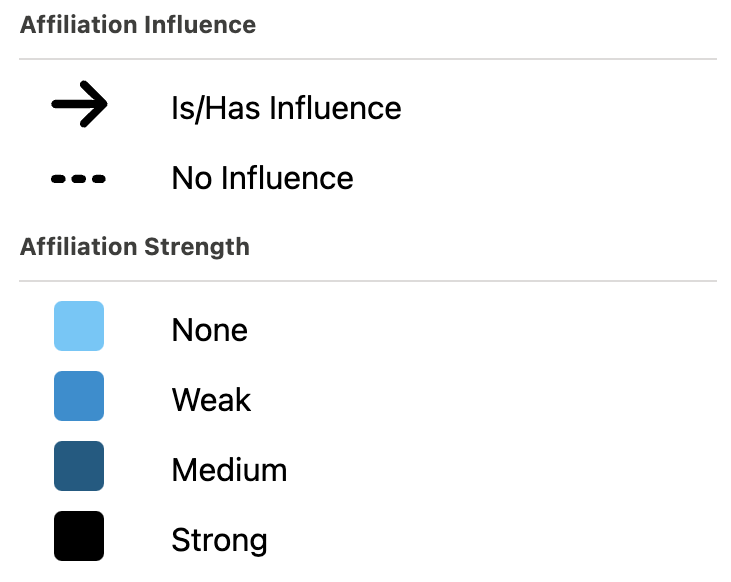
Users can choose to display affiliations on the hierarchy in the settings menu. Affiliations display as curved lines on the hierarchy.
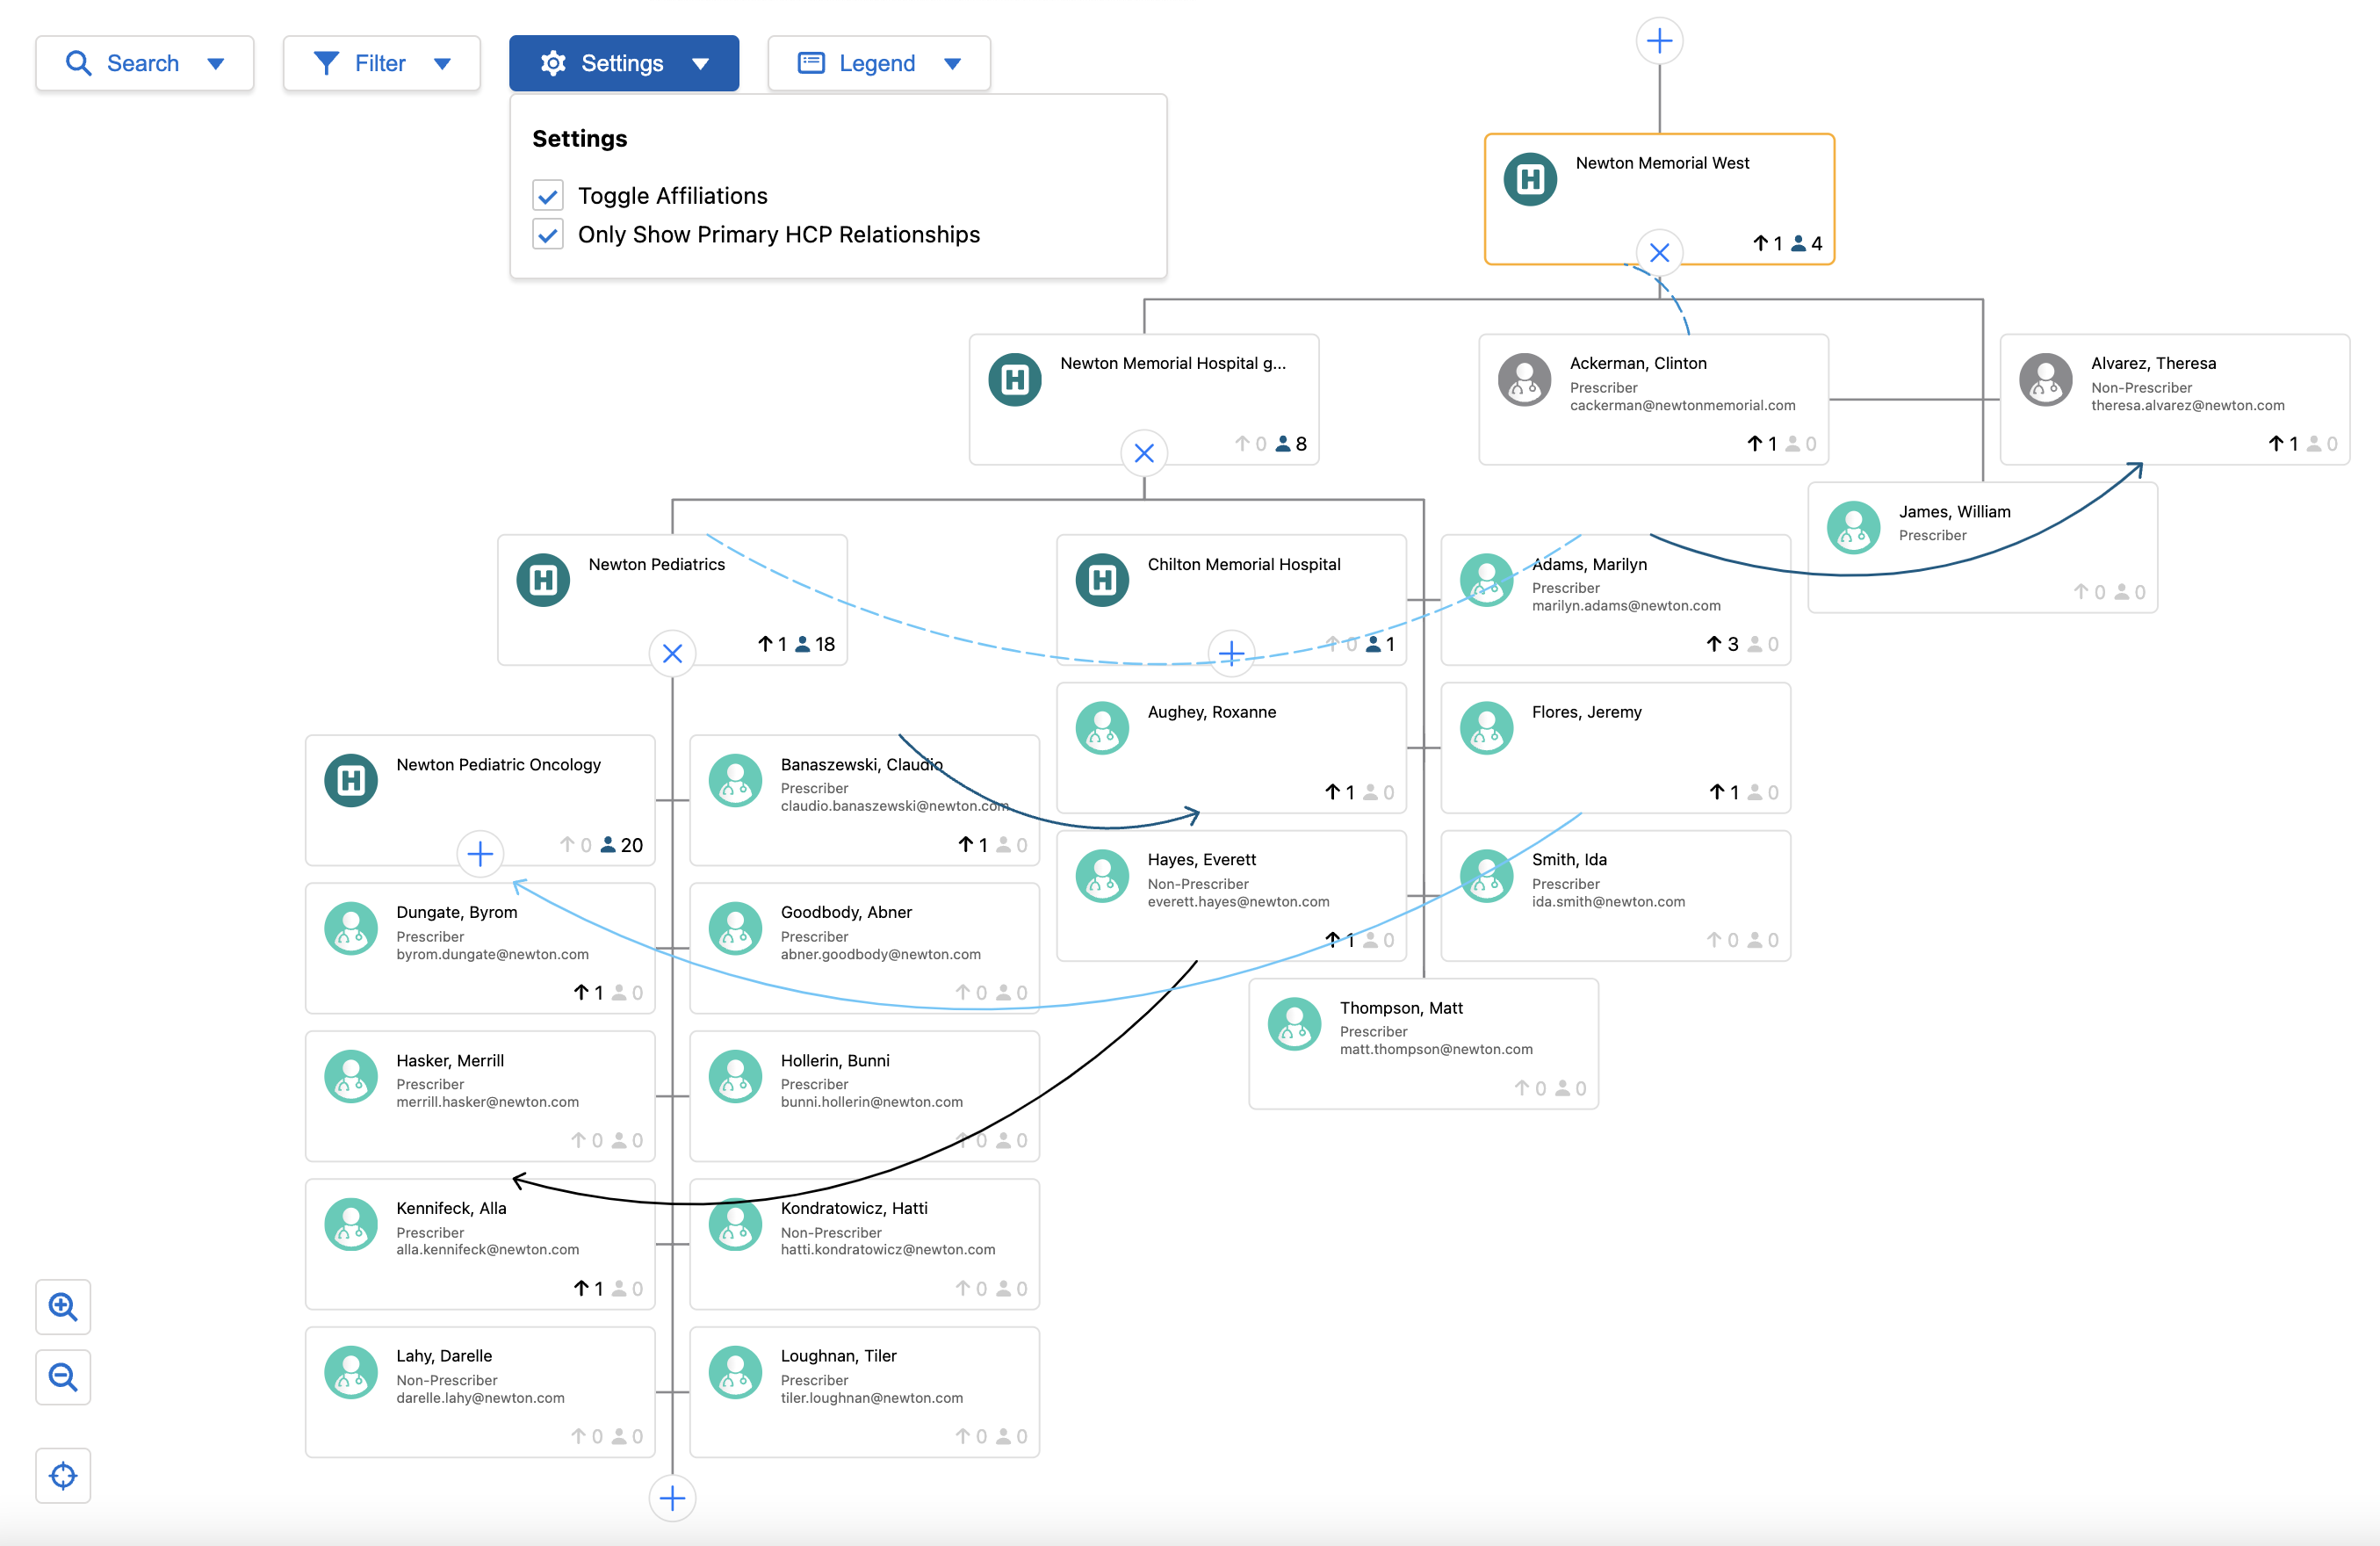
Affiliation influence determines the shape of the line and affiliation strength determines the color.
Displaying Out-of-Territory Accounts
Related out-of-territory accounts display along with users’ accounts in the Stakeholder Navigator. This enables users to more accurately manage their accounts, and plan account interactions by providing a full view of their accounts’ professional networks.
Configuration is not needed for this feature.
When a user views an account hierarchy in the stakeholder navigator, any out-of-territory accounts in the account hierarchy display. Out-of-territory accounts are displayed with a gray account icon.
Account details and filters display for out-of-territory accounts in the same way they do for in-territory accounts.
All territories related to at least one of the accounts in the selected account hierarchy display in the territory section of the Filter dropdown, even if the user is not assigned to that territory.
On the iPad platform, out-of-territory accounts display only if they are associated with an in-territory account synced to the iPad.
Only Show Primary HCP Relationships
By default, HCPs only display under their primary parent account, even if they have multiple parent accounts in the selected account hierarchy. To display HCPs accounts under each of their parent accounts, select the Only Show Primary HCP Relationships toggle from the Settings menu. When an HCP has multiple parent accounts in the same hierarchy, an icon displays in the bottom-left corner of the HCP’s account card to indicate their account displays multiple times in the current stakeholder navigator view.
For example, if Dr. Ackerman has three parent accounts in the Newton Memorial Hospital hierarchy, his account displays three times in the stakeholder navigator, under each parent account.
Displaying multiple parent accounts is only available for person accounts. It does not apply to business accounts.
Adding Out-of-Territory Accounts to User Territories
To add an out-of-territory account to one of a users' assigned territories:
-
Select the Add to Territory button. When users add an account to their territory from the stakeholder navigator, an Account_Territory_Loader_vod record is automatically created with the added territory listed in the Territory_To_Add_vod field.
-
Do one of the following:
- If the user is only assigned to one territory, a confirmation message displays. Select Yes to add the account to the territory.
- If the user is assigned to more than one territory, a list of possible territories displays. Select the appropriate territory, then select OK to add the account to the territory.
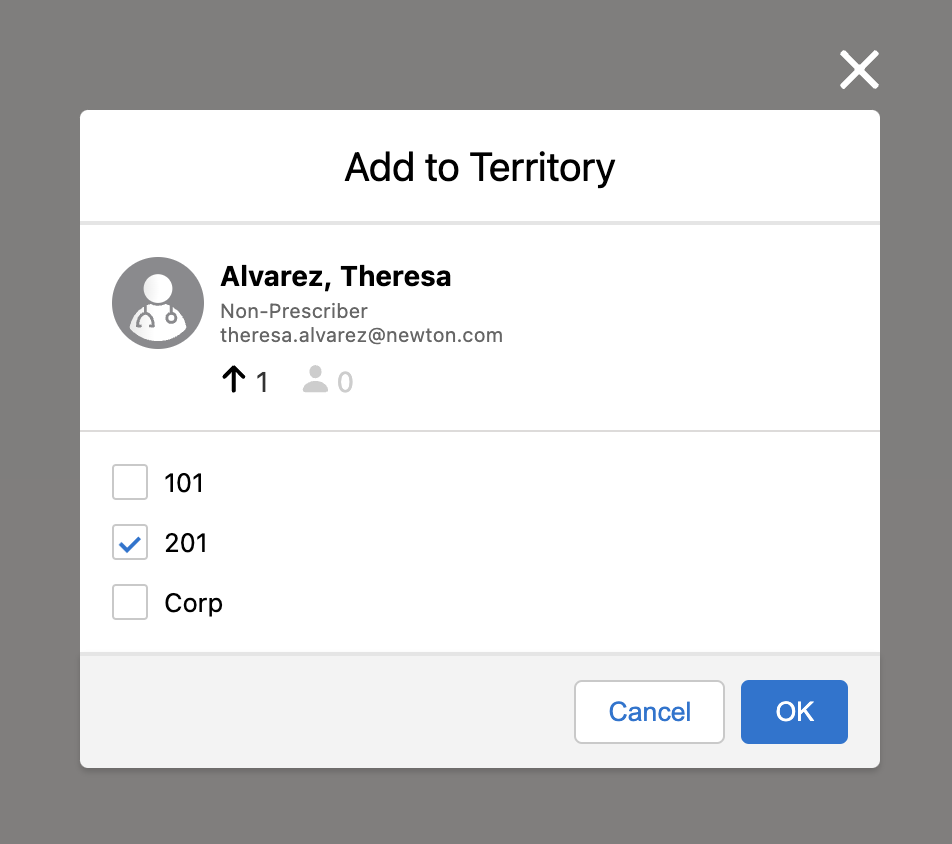
Users must be assigned to at least one territory to use this functionality. If the user is not assigned to any territories, an error message displays when they select Add to Territory.
Related Topics
Approved Email
Multi-Product Approved Email Content
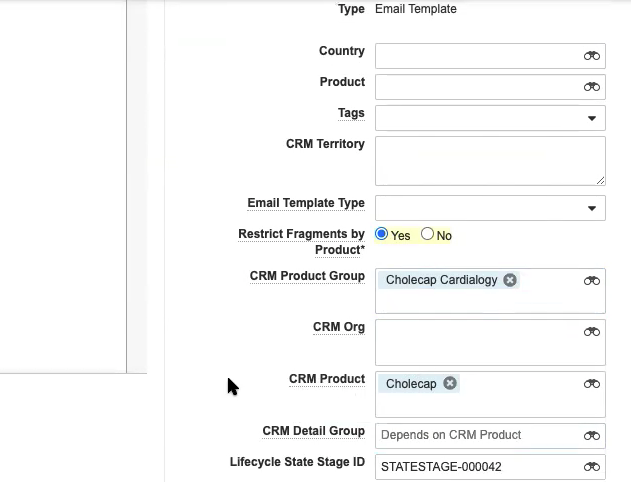
Content creators can avoid duplicating Approved Email content in Vault by assigning multiple products to Email Templates and Email Fragments. Multi-product content then generates in CRM as one Approved_Document_vod record per assigned product. This results in a more streamlined content library that is easier to maintain.
Each Approved_Document_vod record in CRM associates with only one product, determined by the Product_vod field. For example, if one Email Fragment is assigned to five products in Vault, five Approved_Document_vod records are created in CRM, one for each product.
For example, Christine Roberts is a content creator at Verteo BioPharma responsible for three products: Cholecap, Restolar, and Labrinone. She creates a single email fragment that can be used with all three products. After the email fragment is approved and pushed to CRM, three new Approved Documents are created, one for each product, available to all end users assigned to any of the three products.
Considerations for Multi-Product Approved Email Content
- The sync ignores any Vault products assigned to Approved Email content when CRM Products and/or CRM Product Groups are added. Only content with multiple CRM Products and/or CRM Product Groups are copied in CRM.
- The sync ignores any CRM Detail Groups assigned to Approved Email content when CRM Product Groups are added
- This feature uses the following Vault document fields:
- CRM Products
- CRM Product Groups – Represents a pairing of a CRM Product and a CRM Detail Group
- The crm_detail_group__v field can still be used in single-product content
- MyInsights content referencing the Vault_Document_ID_vod field on the Approved_Document_vod object may return multiple records due to duplicate Vault_Document_ID_vod values. Developers should test and make all appropriate updates to these visualizations after this feature is enabled.
- Events Management Email Templates do not support multi-product content
- Multi-product Approved Email Key Messages are not supported
Assigning Multiple Products to Content
CRM Products and CRM Product Groups can be added to Approved Email content via the corresponding picklist on the appropriate Document record in Vault:
- Navigate to the appropriate Document record in Vault.
- Select Edit.
-
Populate the appropriate picklists:
- crm_product__v
- crm_product_group__v – Represents a pairing of a CRM Product and a CRM Detail
- Select Save.
An Approved_Document_vod record is added in CRM for each added CRM Product or CRM Product Group during the next sync.
If a CRM Product or CRM Product Group is deselected from the picklist on the Document, the corresponding Approved_Document_vod record in CRM automatically expires during the next sync.
When migrating content from single-product to multi-product, content creators should be aware of how the picklists interact using the examples in the below section.
Interaction of the Picklists
The picklists interact to determine the values of the Product_vod and Detail_Group_vod fields of the resulting Approved_Document_vod records in CRM.
Use the crm_product_group__v multi-select picklist to designate product-detail group pairs. Optionally, use the crm_product__v picklist to create records in CRM unaffiliated with a detail group.
The following table represents example field inputs in Vault and the values of the subsequent records generated in CRM:
|
Input (Vault) |
Output (CRM) |
|||
|---|---|---|---|---|
|
crm_product__v |
crm_product_group__v |
Document 1 |
Document 2 |
Document 3 |
|
n/a |
|
|
|
|
|
n/a |
|
|
n/a |
|
Cholecap Cardiology |
|
|
|
Using Multi-Product Approved Email Content from CLM Presentations
The getApprovedDocument() method in the CLM library references the Vault_Document_ID_vod field to select the appropriate Approved_Document_vod record. With Multi-Product support enabled, multiple Approved_Document_vod records can have identical Vault_Document_ID_vod fields.
Multi-product support for this method requires a JS Library and app version of at least 212.0.100.
When this occurs, the following logic is used to select an individual Approved_Document_vod record when the method is called:
- If the user does not have FLS read permission to the Product_vod and Detail_Group_vod fields on the Key_Message_vod object, an error displays
- If an Approved Document matches the Product_vod and Detail_Group_vod (if populated) fields on the current Key Message, that Approved Document is used
- If an Approved Document does not match any of these fields, the first Approved Document record available for the given Vault_Document_ID_vod sorted by SalesforceID is used
Using Multi-Product Content with Suggestions
When sending an email from a Suggestion, the Email_Template_ID_vod field on the Suggestion_vod record returns multiple Approved Documents, the following logic is used against the first available Suggestion_Tag_vod record to determine which Approved Document loads:
- If an Approved Document matches the Product_vod field of the first Suggestion Tag, that document is used
- If the first Suggestion Tag does not have a Product_vod field that matches any of the returned Approved Documents, the next Suggestion Tag is tried instead for matching
- If no Suggestion Tags have a Product_vod field that matches any of the returned Approved Documents, the Send Email page displays with no templates or filters preloaded
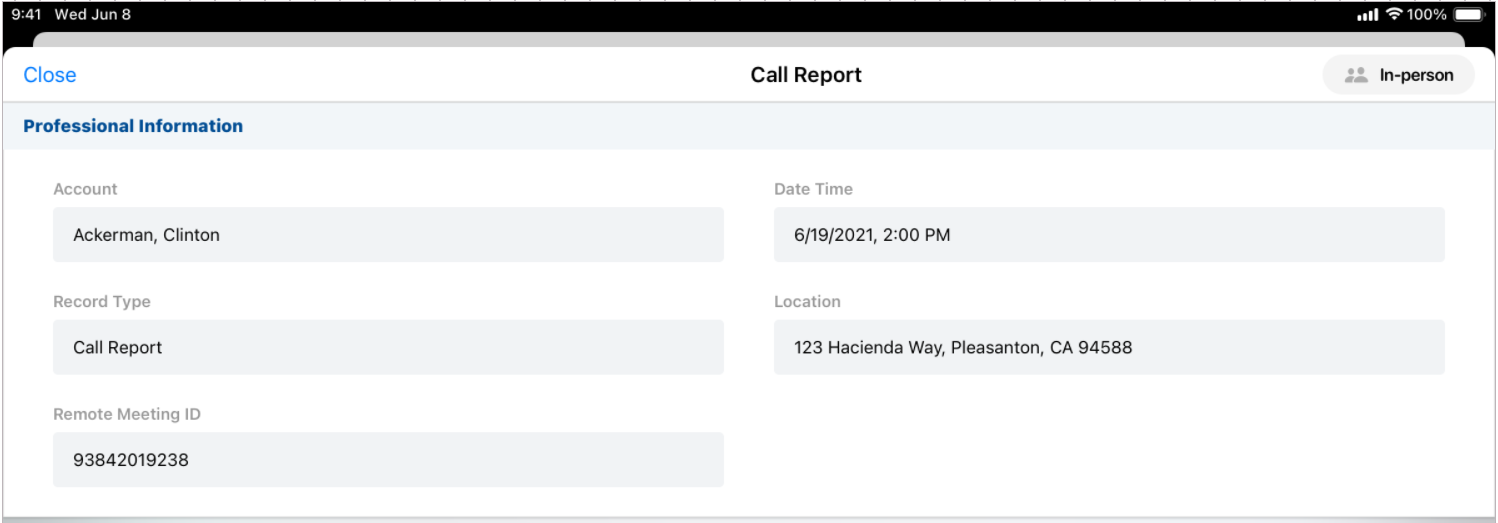
Call Reporting
Selecting a Call Channel
This feature is available with the production release on August 12, 2021.
As users increasingly move to methods of HCP engagement beyond in-person calls, capturing call channel information on each call report is crucial for capturing accurate, comprehensive call information. This feature enables collection of standardized, actionable benchmarking data on user interactions with HCPs and serves as a foundational use of call values for integrated CRM functionality.
For example, Sarah Jones conducts a call with Dr. Ackerman over video conference. When she creates the call report for this meeting, she is prompted to select the appropriate call channel on the call report. Through Veeva, Sarah’s company uses this data to track the different methods of communications used for calls and compare their call methods against data on industry-wide practices.
Considerations for Selecting a Call Channel
Selecting the Call Channel from a Call Entry Point
When users create a call report from one of the following entry points, they are prompted to select a call channel before opening the call report:
- Accounts page (list view and table view)
- Account Details page
- The More Actions menu on the Account Details page
To select a call channel, select the Record a Call button and then select the appropriate call channel from the drop down menu.
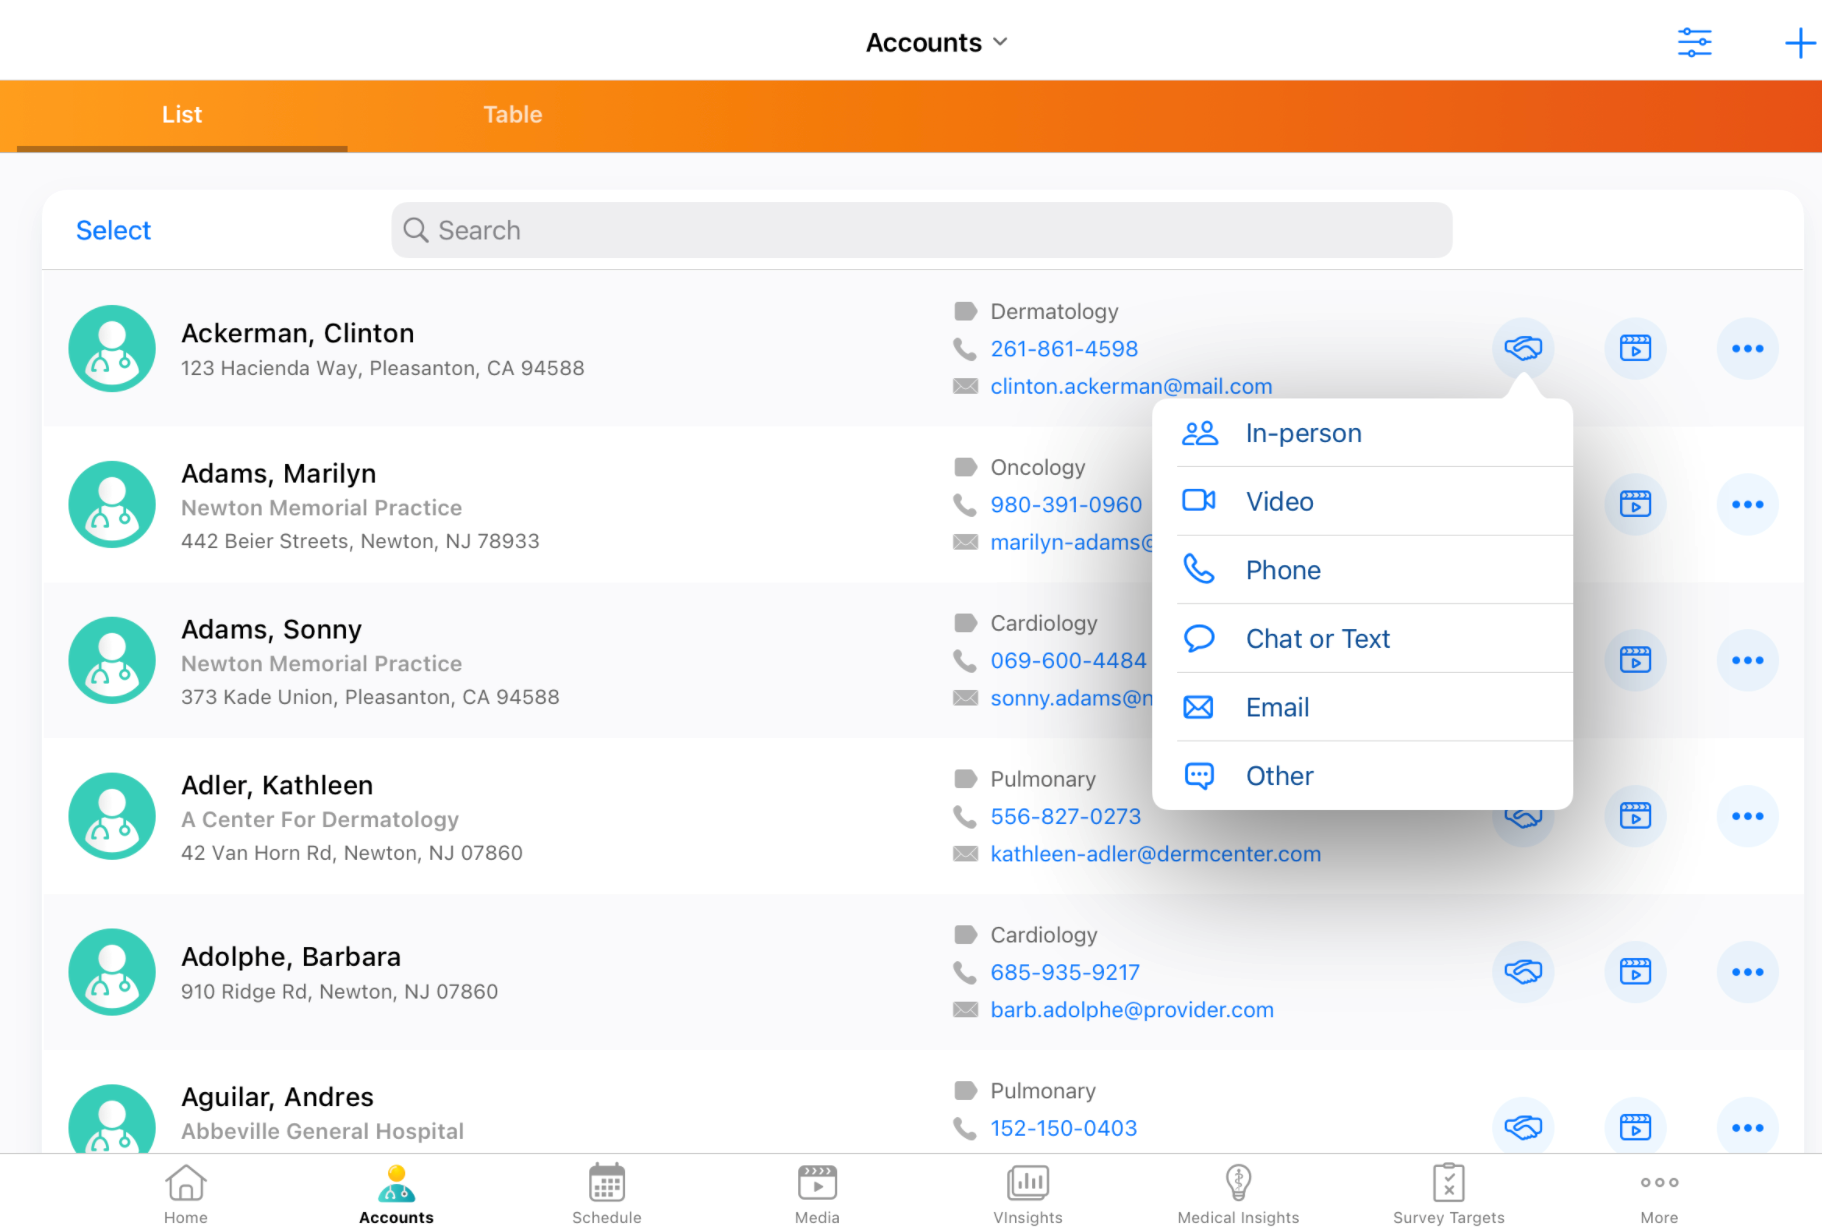
The user’s selection is then populated on the newly created call report.
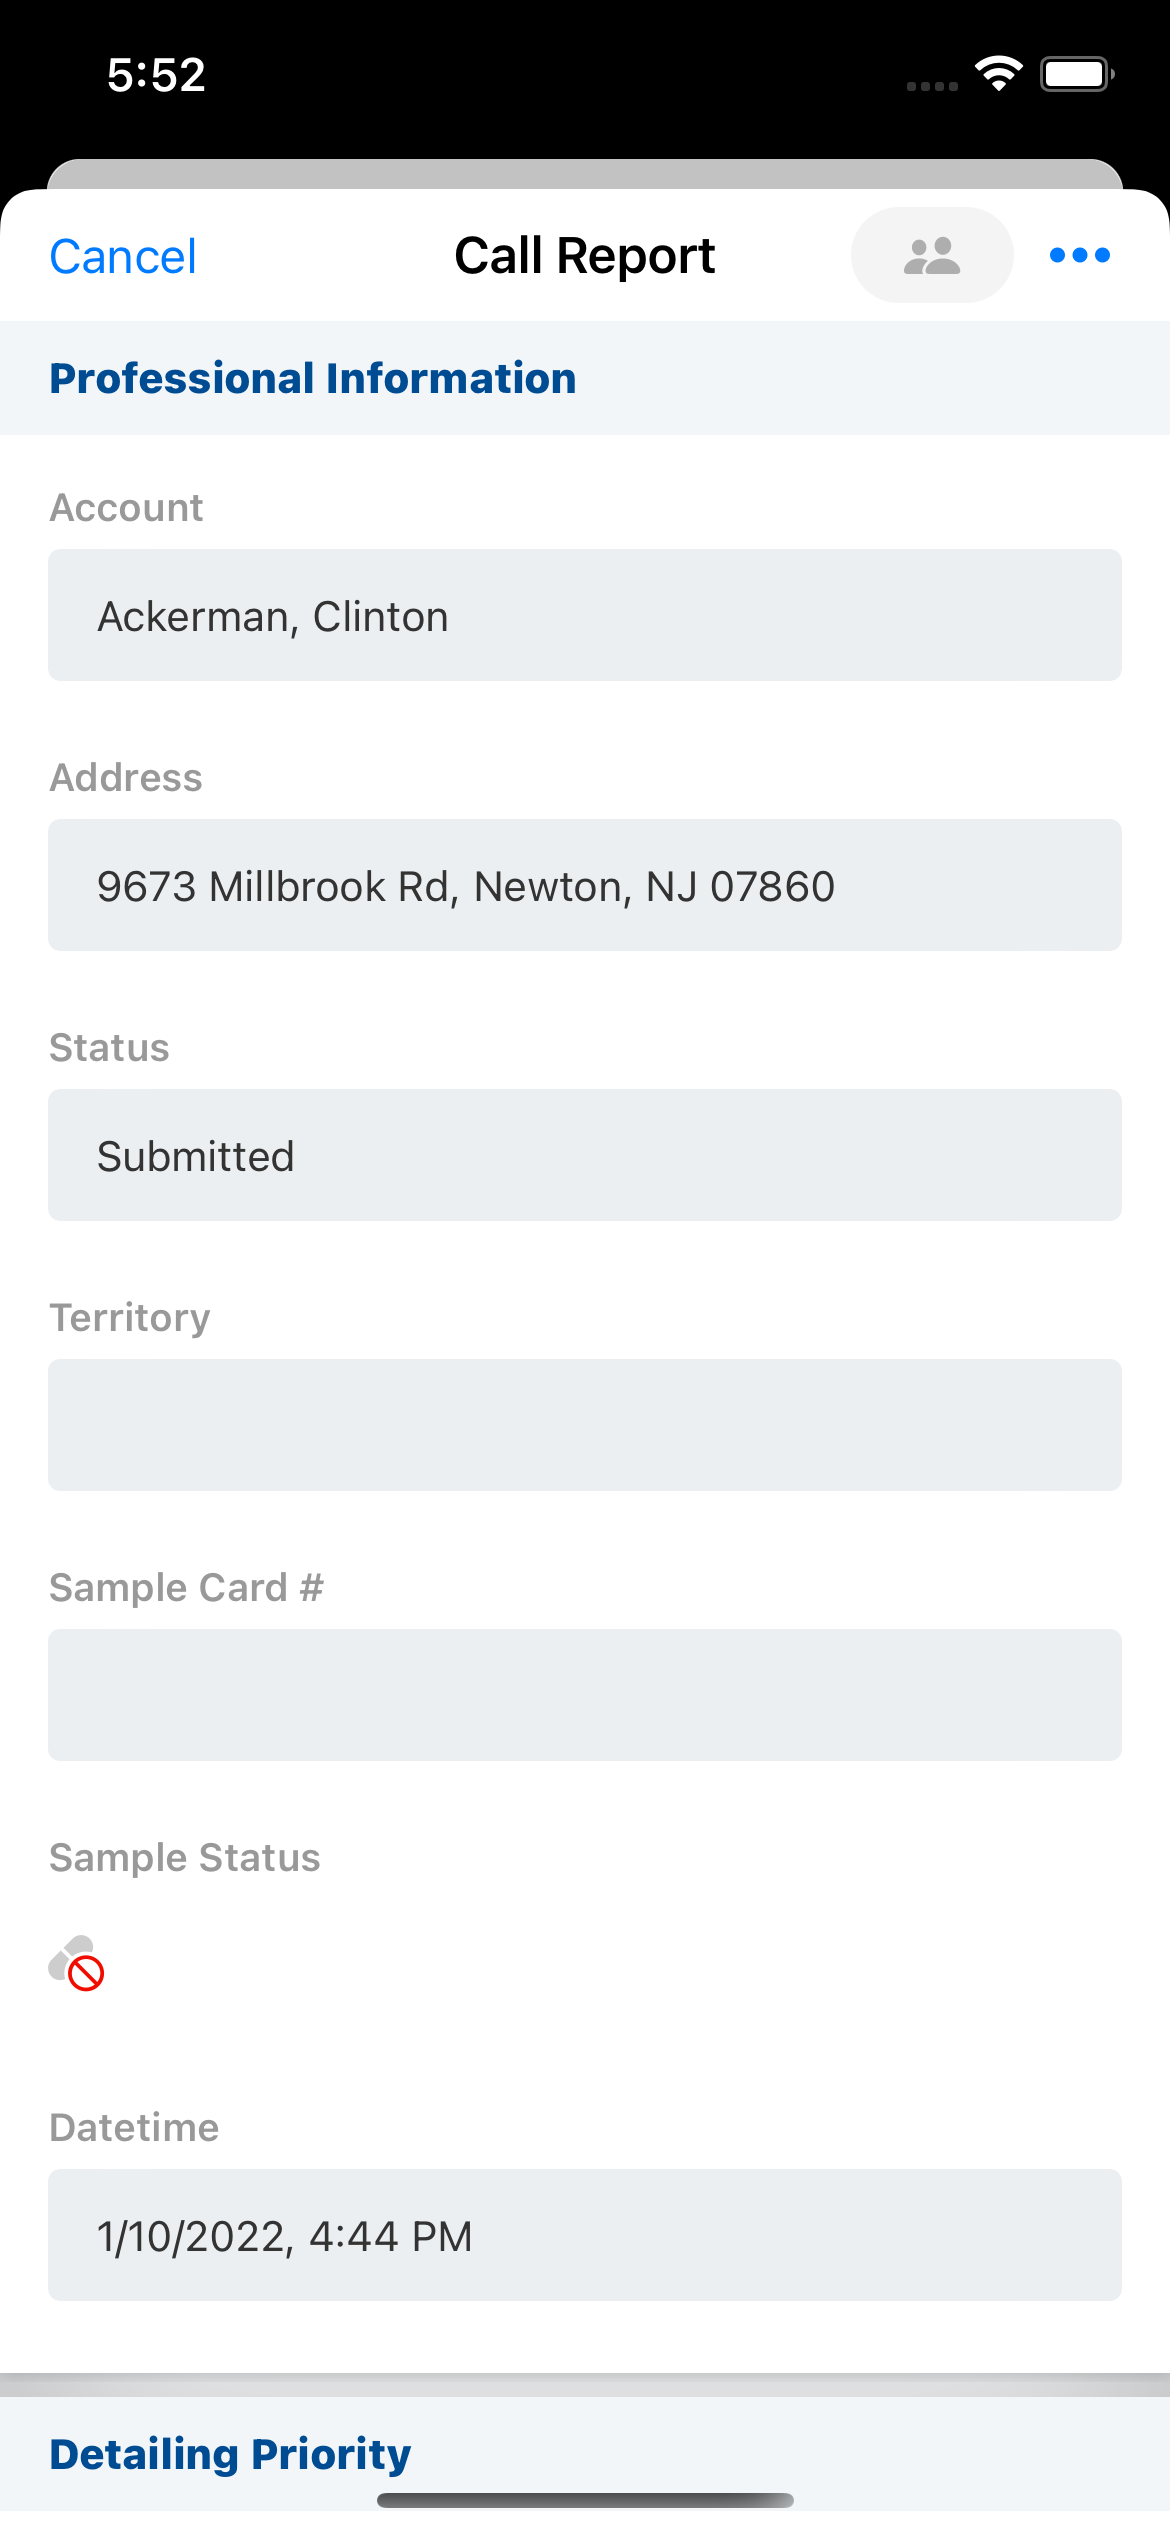
Selecting the Call Channel on the Call Report
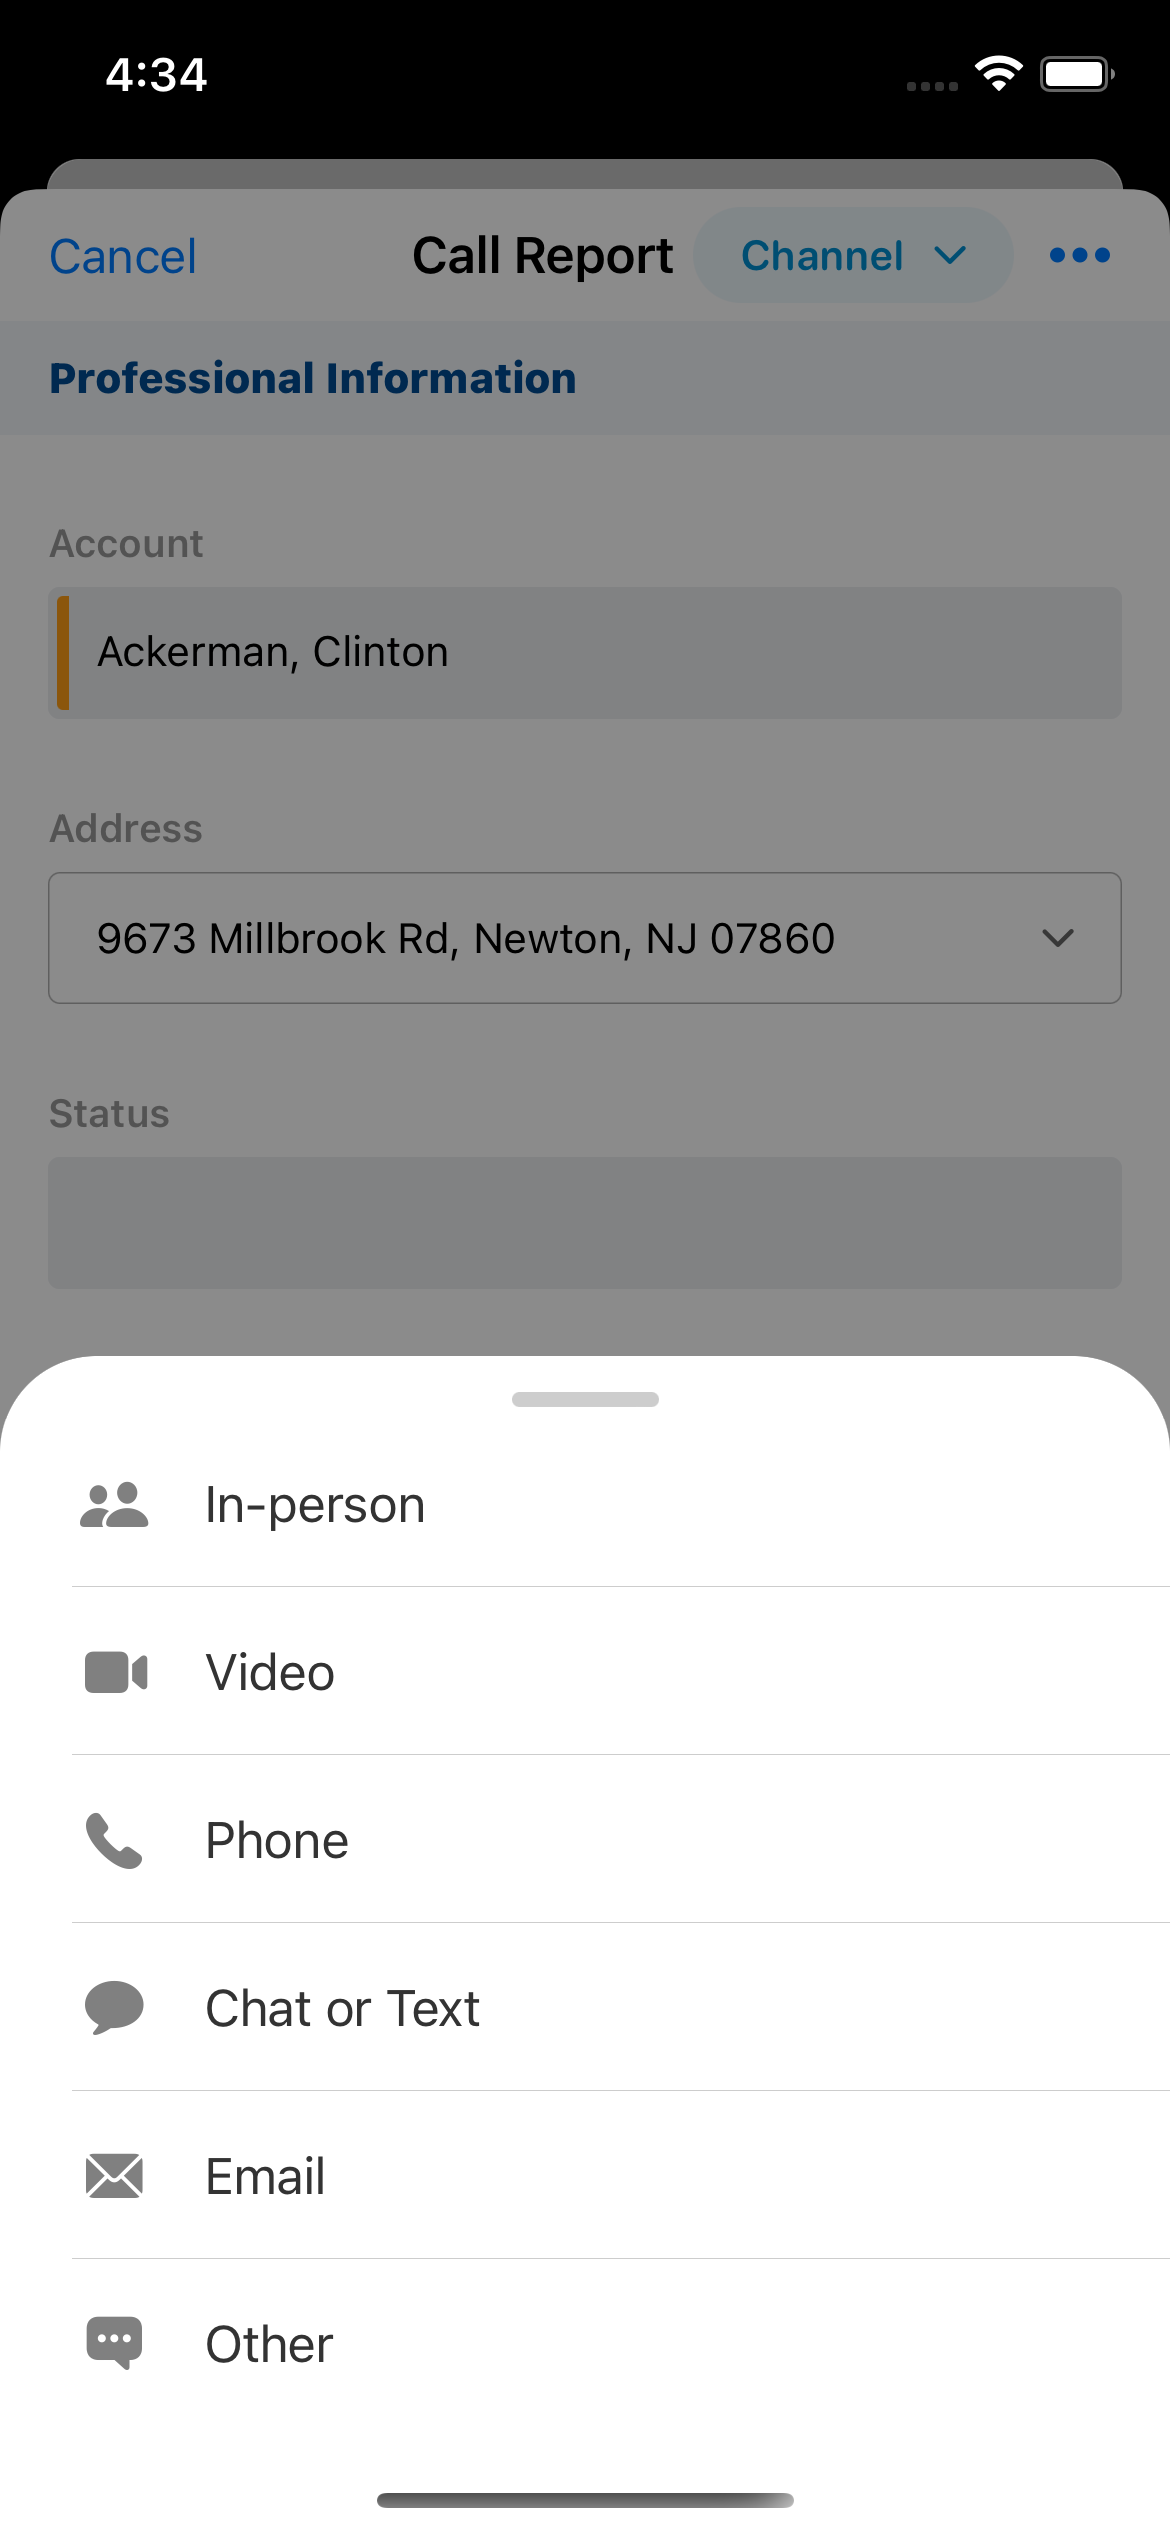
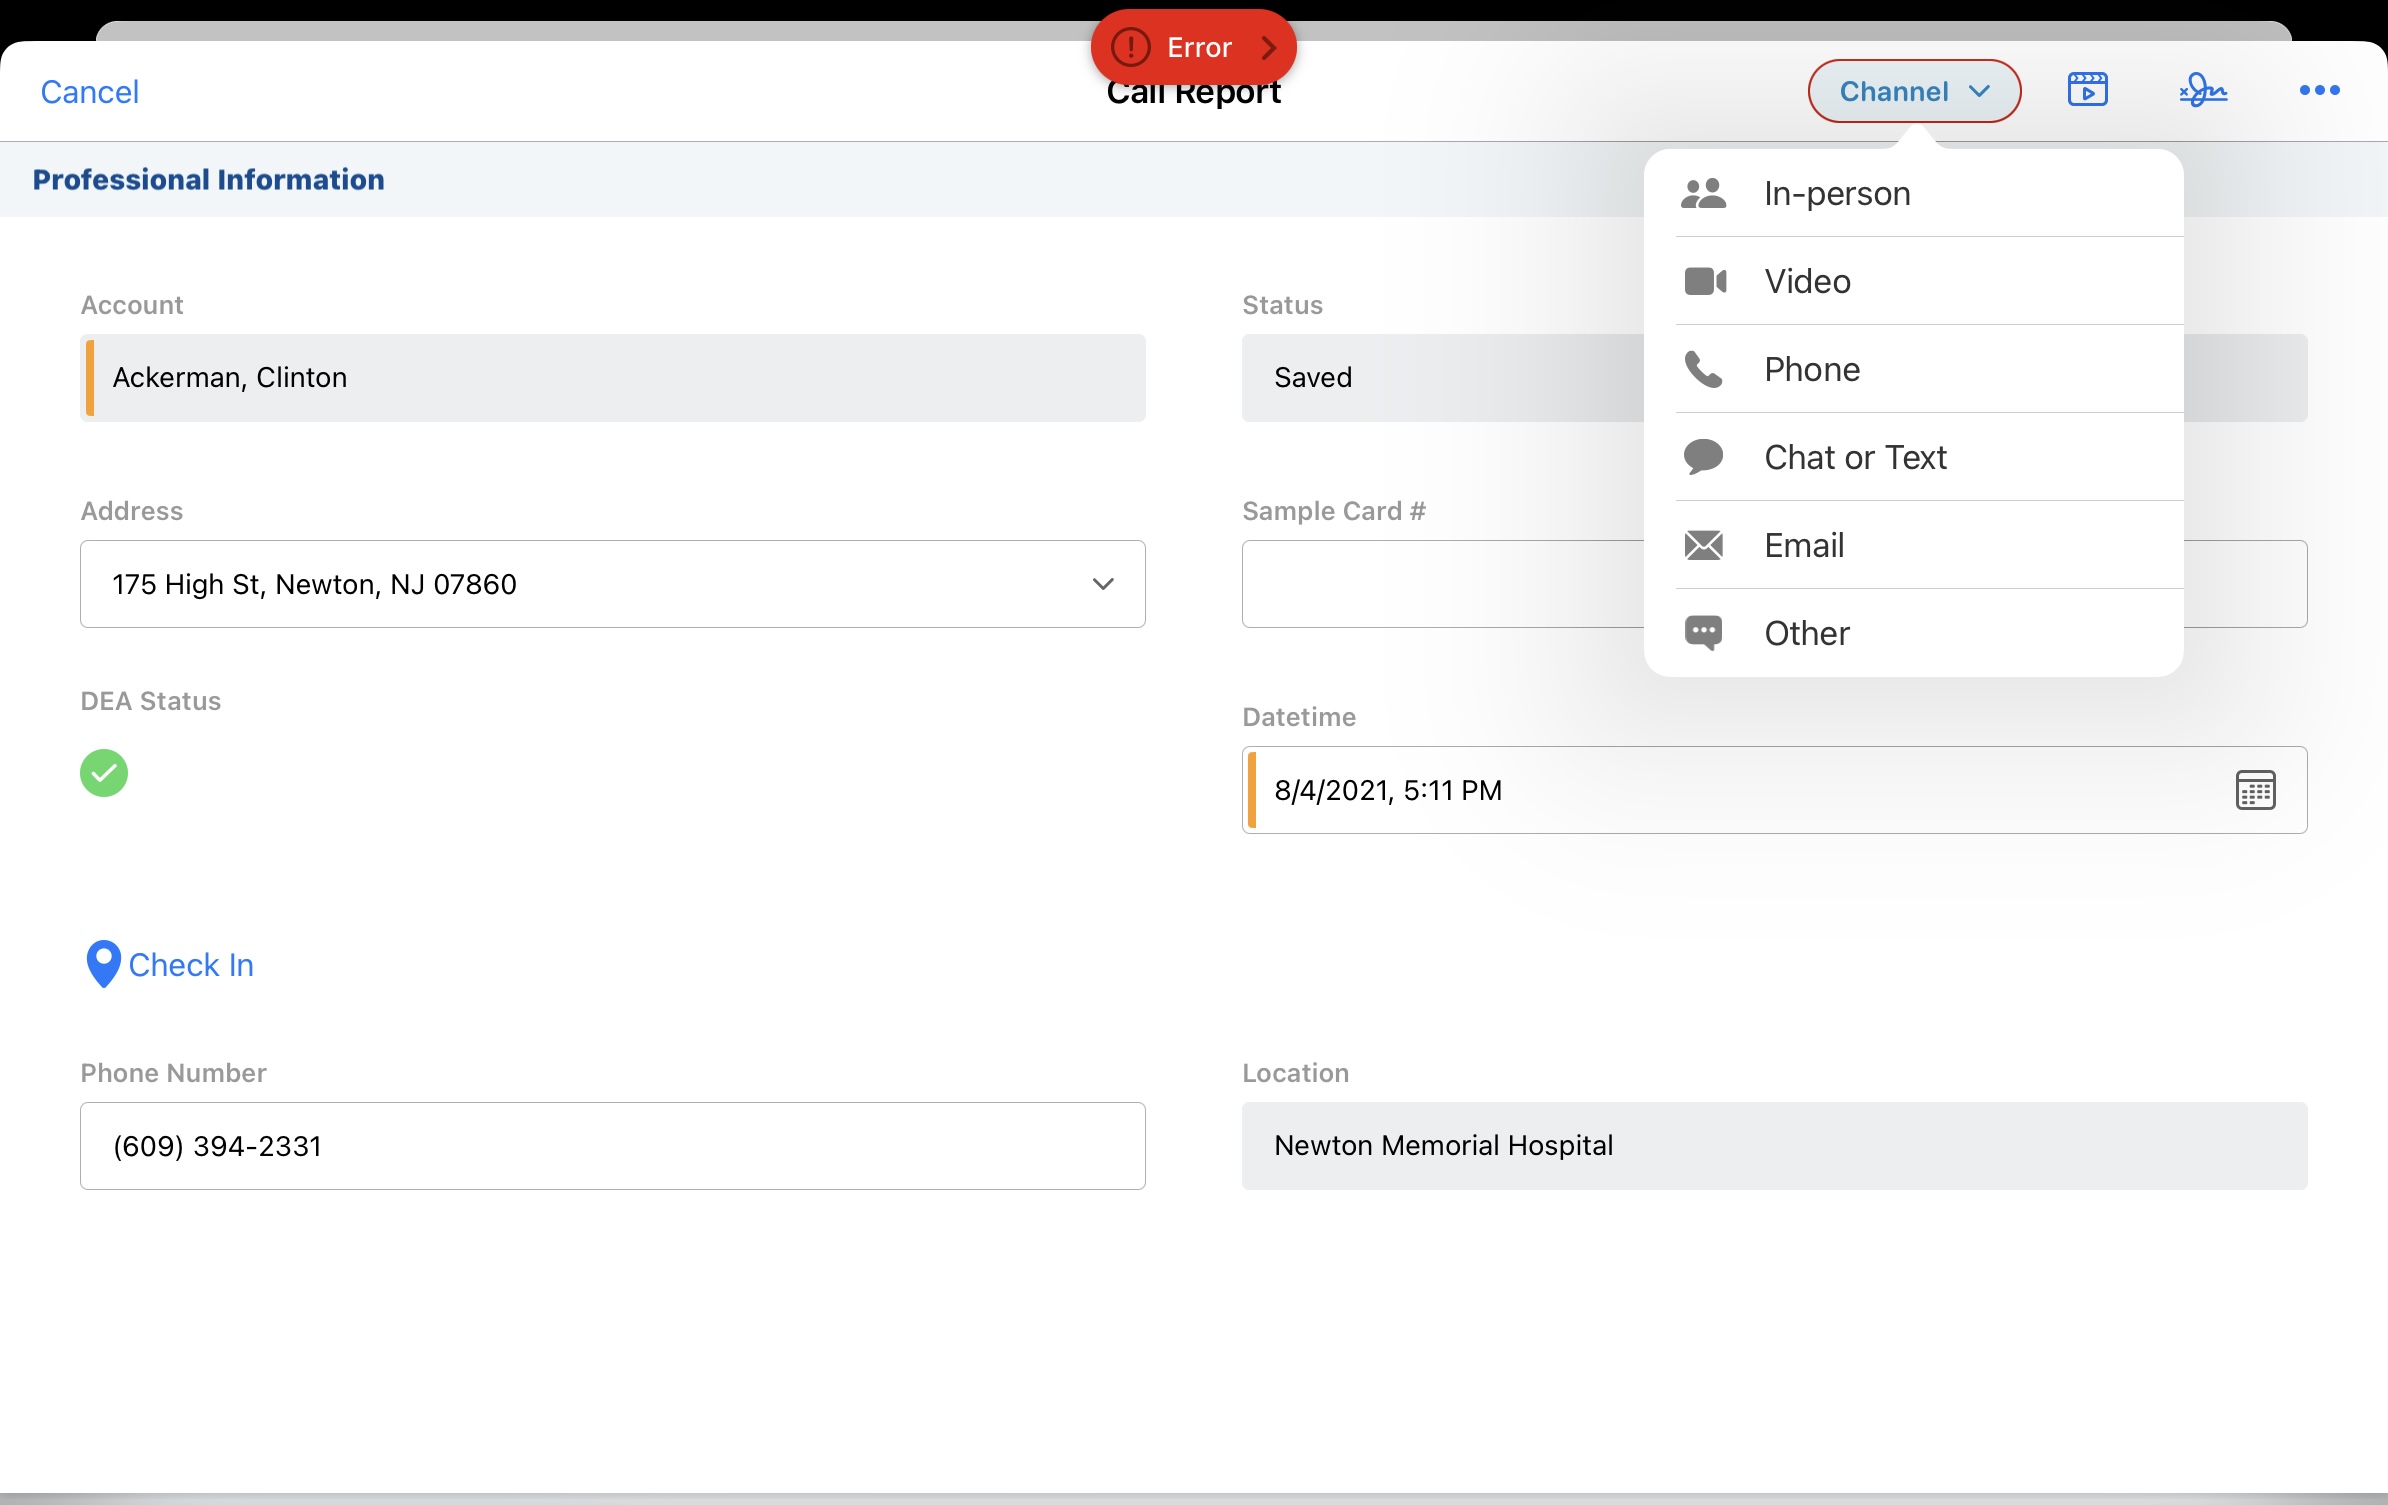
For all other entry points, users select a call channel on the call report. Users can change the selected channel until they submit the call. To select or change the call channel from the call report:
- Select the Channel selector in the call header to display the picklist. When users create a new call report where the call channel is not selected, the picklist displays automatically.
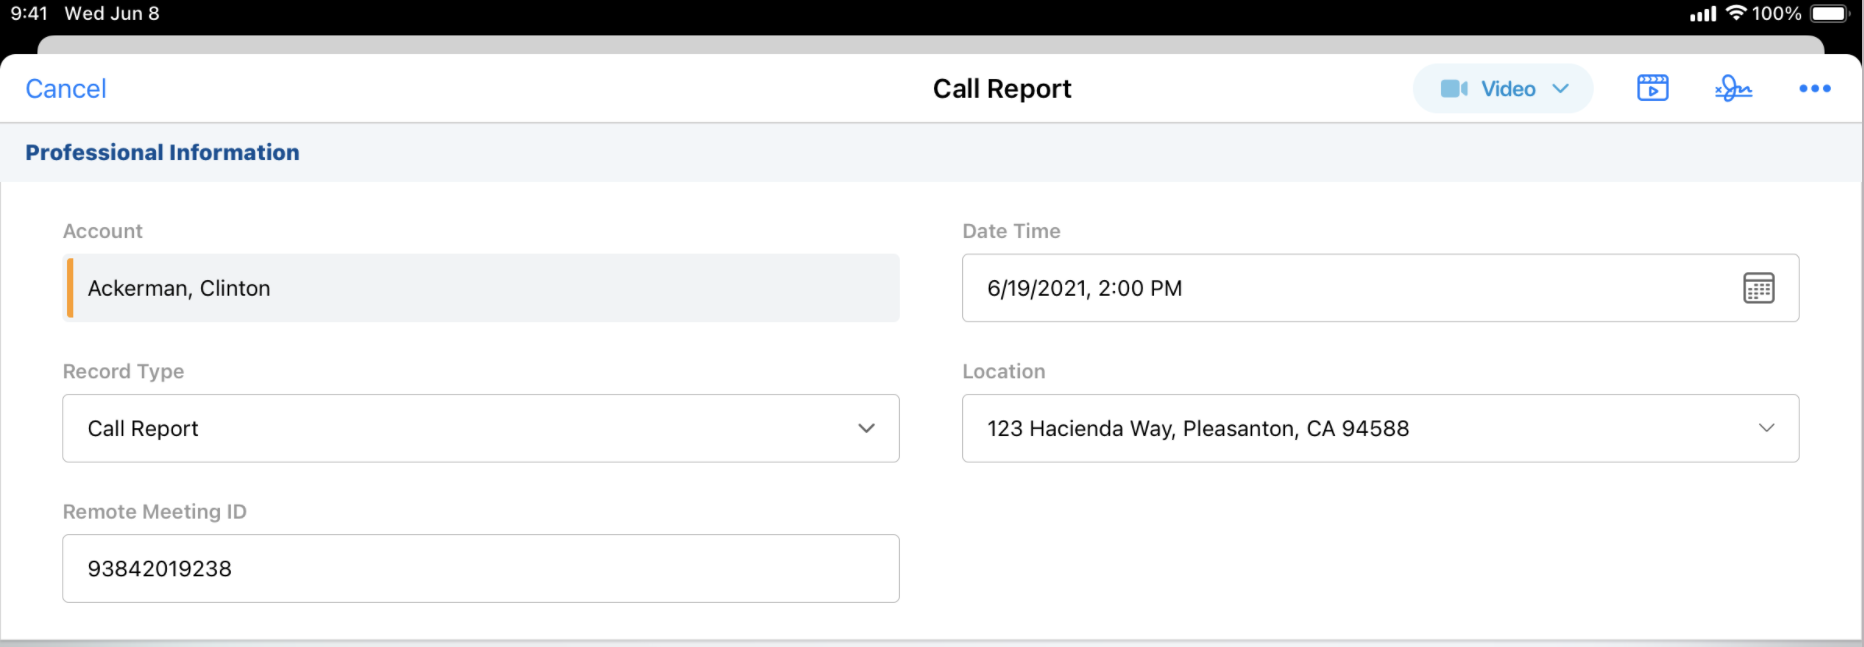
- Select the appropriate option from the channel picklist. When the call channel is selected, the corresponding icon displays in the call header.
For group calls with unique activities enabled, users select the call channel on the parent call. The selected call channel is then copied to all attendee (child) calls.
Submitting the Call Report
If users attempt to submit a call report without selecting a call channel, an error message displays. To dismiss the error and submit the call report, select the appropriate channel.
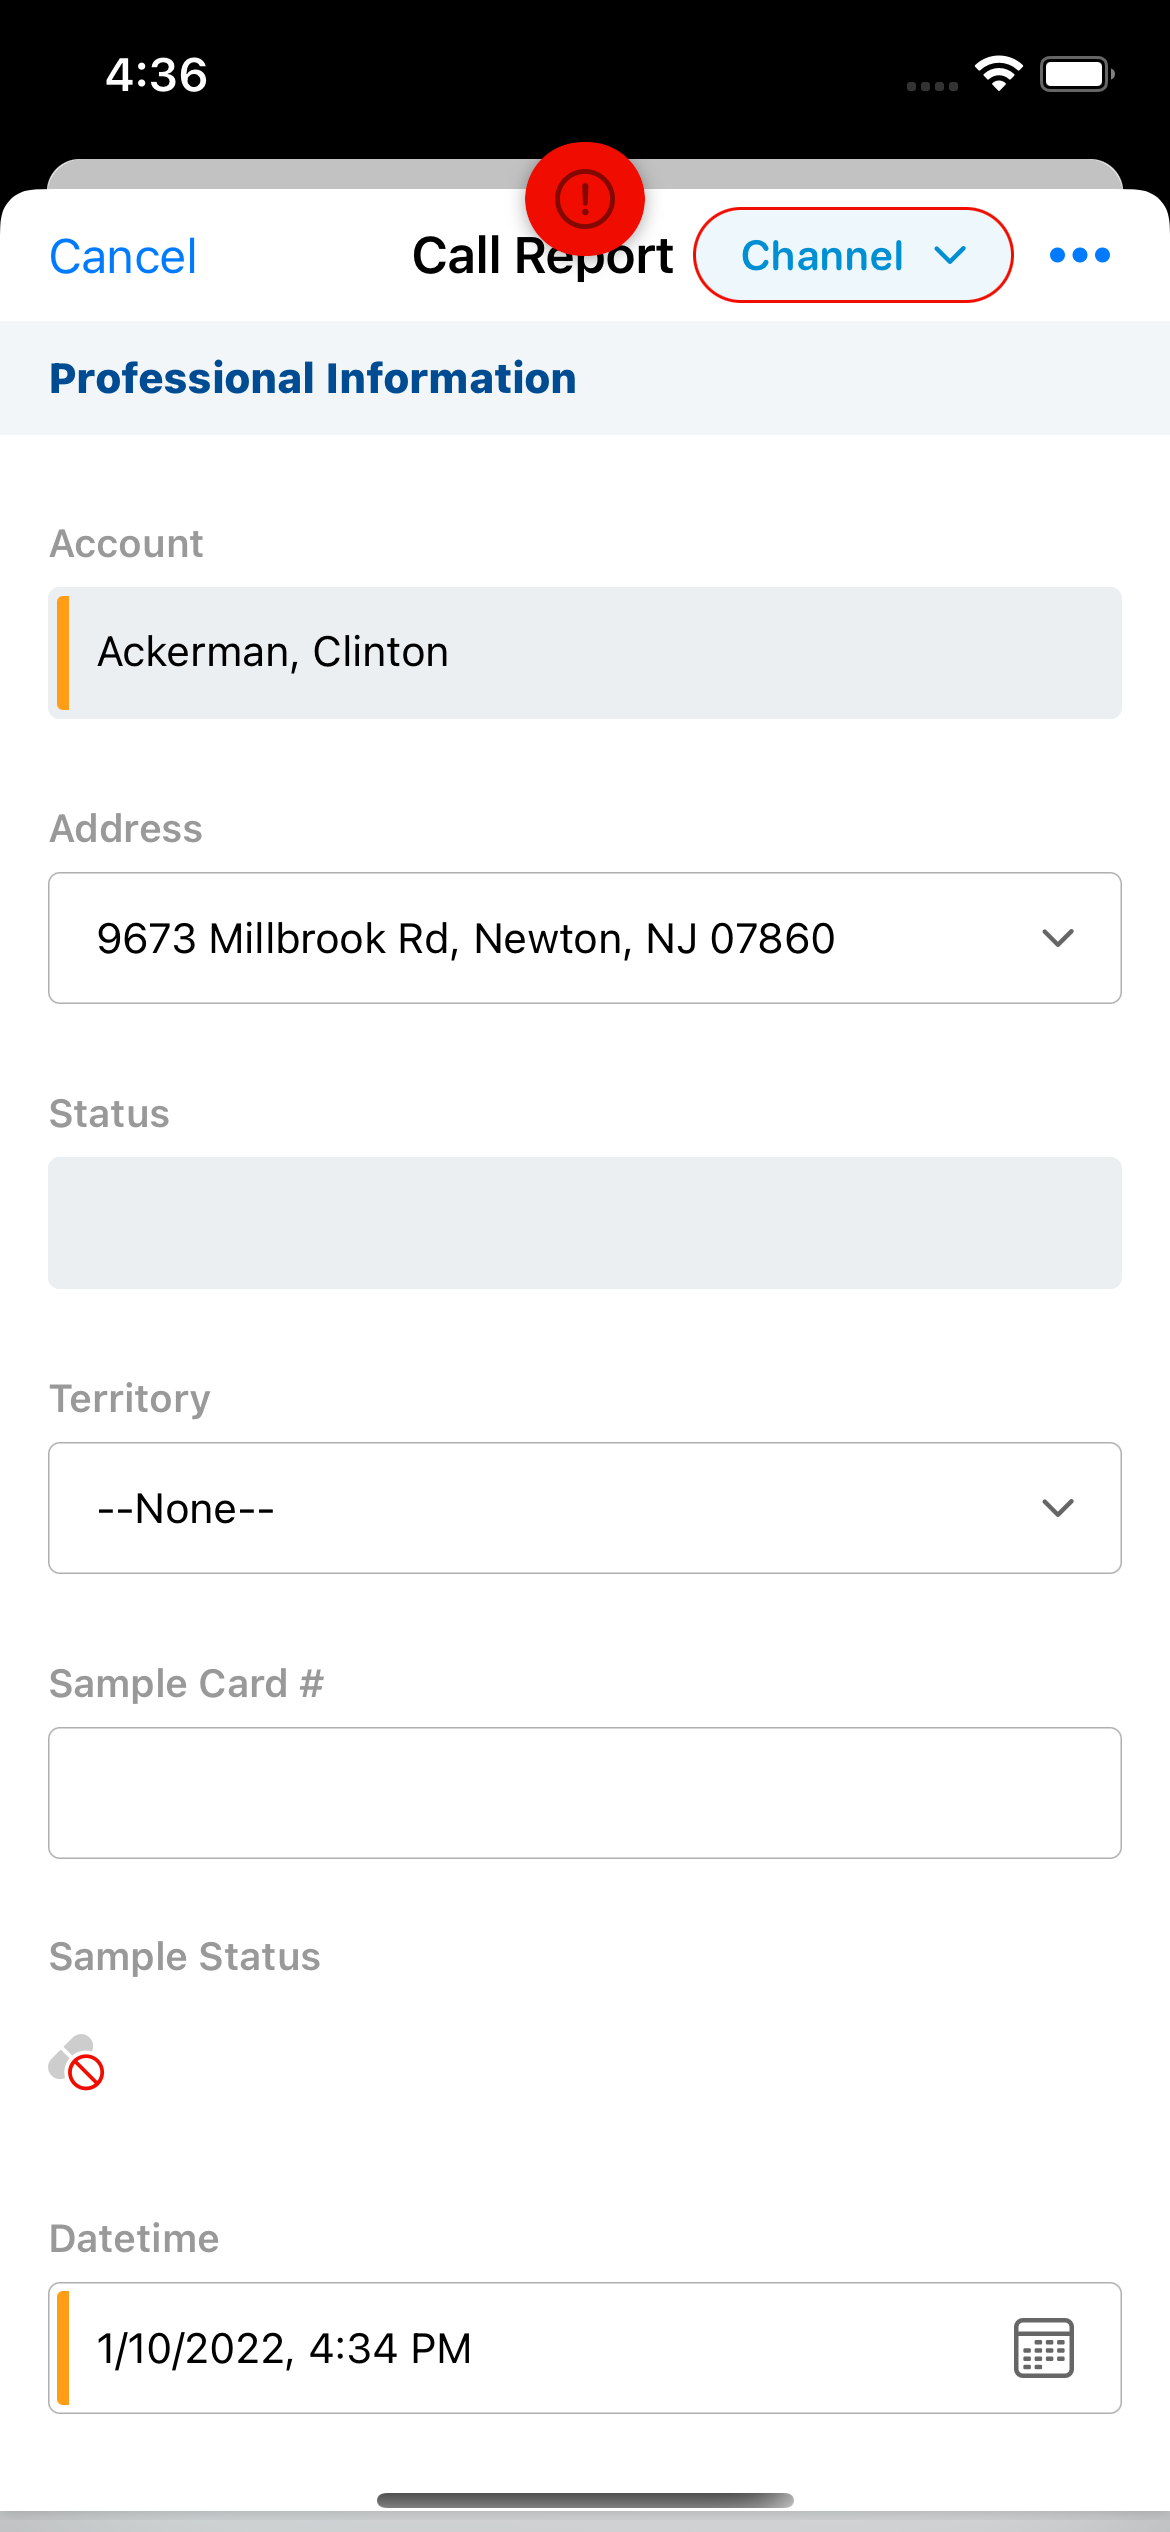
On submitted calls, the call channel picklist is read-only and the channel selector displays in gray. Users cannot edit the call channel for submitted calls.
Call Channel Picklist Values
The following values are available in the call channel picklist:
|
API Name |
Label Displayed in the Call Channel Picklist |
|---|---|
| Face_to_face_vod | In-person |
| Video_vod | Video |
| Phone_vod | Phone |
| Message_vod | Chat or Text |
| Email_vod | |
| Other_vod | Other |
The call channel picklist values are hard-coded and cannot be removed, translated, added to, or otherwise modified, except to restrict specific values for Browser users (for more information, see Restricting Call Channel Options). Making changes to the picklist values will result in sync errors for submitted calls that cannot be resolved. There is no default value, and customer-configured default values are not supported.
CLM
Supporting Multi-Product CLM Presentations
Content creators can avoid duplicating CLM content in Vault by assigning multiple products to Multichannel Presentations (binders), Multichannel Slides, and document records created via auto-publishing. Multi-product content then generates in CRM as one CLM_Presentation_vod and Key_Message_vod record per assigned product. This results in a more streamlined content library that is easier to maintain.
Each CLM_Presentation_vod and Key_Message_vod record in CRM associates with only one product, determined by their Product_vod fields. For example, if one Multichannel Presentation with one Multichannel Slide is assigned to five products in Vault, five CLM_Presentation_vod and Key_Message_vod records are created in CRM, one for each product.

For example, Verteo BioPharma has a CLM presentation containing key messages for both Cholecap and Restolar. Sarah Jones is only assigned to the product Cholecap in her My Setup products, while Christine Roberts is only assigned to Restolar. Both Sarah and Christine need access to the presentation. When the presentation is synced from Vault, two versions are created: one assigned to the product Cholecap and the other to Restolar. After Sarah and Christine sync their mobile devices, the presentation displays in both of their media libraries.
Considerations for Supporting Multi-Product CLM Presentations
- The CLM sync ignores any Vault products assigned to presentations when CRM Products and/or CRM Product Groups are added. Only presentations with multiple CRM Products and/or CRM Product Groups are copied in CRM.
- The CLM sync ignores any CRM Detail Groups assigned to presentations when CRM Product Groups are added.
- CRM Detail Groups can still be used for single-product content
- The following information from CRM should display in Vault:
- CRM Products
- CRM Product Groups – Represents pairings of CRM Products and CRM Detail Groups
- Multi-product presentations created via single doc publishing are supported
- Multi-product presentations containing sub-presentations and shared resources are supported as long as one of the following is true:
- There are no CRM Products or CRM Product Groups assigned to the sub-presentations and shared resources
- All available CRM Products or CRM Product Groups are assigned to the sub-presentations and shared resources added to their linked presentations
- Multi-product presentations with assigned CRM Products and/or CRM Product Groups from different CRM orgs are supported
- Multi-product presentations uploaded via FTP are not supported
Assigning Multiple Products to CLM Content
CRM Products and CRM Product Groups can be added to CLM content via the corresponding picklists on the appropriate records in Vault.
Each presentation and all of its slides must be assigned the same CRM Products and CRM Product Groups in Vault. If a presentation or its slides are assigned to different CRM Products or CRM Product Groups, a CLM sync failure occurs and the entire presentation is not synced or copied.
To assign values to Multichannel Presentations (binders) and Multichannel Slides in Vault:
- Navigate to the appropriate Multichannel Presentation record in Vault.
- Select Edit.
- Populate the appropriate picklists:
- crm_product__v
- crm_product_group__v – Represents a pairing of a CRM Product and a CRM Detail Group
- Select Save.
- Navigate to each related Multichannel Slide record.
- Select Edit.
- Populate the appropriate picklists with the same values selected for the Multichannel Presentation record.
To assign values to documents created via single doc publishing:
- Navigate to the appropriate document record in Vault.
- Select Edit.
- Populate the appropriate picklists:
- crm_product__v
- crm_product_group__v – Represents a pairing of a CRM Product and a CRM Detail Group
- Select Save.
When migrating content from single-product to multi-product, content creators should be aware of how the picklists interact using the examples in the below section.
Interaction of the Picklists
The picklists interact to determine the values of the Product_vod and Detail_Group_vod fields of the resulting CLM_Presentation_vod and Key_Message_vod records in CRM.
Use the crm_product_group__v multi-select picklist to designate product-detail group pairs. Optionally, use the crm_product__v picklist to create records in CRM unaffiliated with a detail group.
For example, Verteo BioPharma has a multi-product CLM presentation with two slides assigned the CRM Products Cholecap and Restolar. When the presentation is synced to CRM, two CLM_Presentation_vod records and four Key_Message_vod records are created:
|
Input (Vault) |
Output (CRM) |
|||
|---|---|---|---|---|
|
CRM Products |
CRM Product Groups |
Cholecap Presentation |
Restolar Presentation |
|
|
Multichannel Presentation |
|
n/a |
CLM_Presentation_vod:
|
CLM_Presentation_vod:
|
|
Multichannel Slide 1 |
|
n/a |
Key_Message_vod 1:
|
Key_Message_vod 1:
|
|
Multichannel Slide 2 |
|
n/a |
Key_Message_vod 2:
|
Key_Message_vod 2:
|
In another example, Verteo BioPharma has a multi-product CLM presentation with two slides assigned the CRM Product Groups Cholecap Cardiology and Restolar Oncology. When the presentation is synced to CRM, two CLM_Presentation_vod records and four Key_Message_vod records are created:
|
Input (Vault) |
Output (CRM) |
|||
|---|---|---|---|---|
|
CRM Products |
CRM Product Groups |
Cholecap Cardiology Presentation |
Restolar Oncology Presentation |
|
|
Multichannel Presentation |
n/a |
|
CLM_Presentation_vod:
|
CLM_Presentation_vod:
|
|
Multichannel Slide 1 |
n/a |
|
Key_Message_vod 1:
|
Key_Message_vod 1:
|
|
Multichannel Slide 2 |
n/a |
|
Key_Message_vod 2:
|
Key_Message_vod 2:
|
In a final example, Verteo BioPharma has a multi-product CLM presentation with two slides assigned the CRM Products Cholecap and Restolar and the CRM Product Groups Cholecap Cardiology and Restolar Cardiology. When the presentation is synced to CRM, four CLM_Presentation_vod records and eight Key_Message_vod records are created:
|
Input (Vault) |
Output (CRM) |
|||||
|---|---|---|---|---|---|---|
|
CRM Products |
CRM Product Groups |
Cholecap Presentation |
Restolar Presentation |
Cholecap Cardiology Presentation |
Restolar Cardiology Presentation |
|
|
Multichannel Presentation |
|
|
CLM_Presentation_vod:
|
CLM_Presentation_vod:
|
CLM_Presentation_vod:
|
CLM_Presentation_vod:
|
|
Multichannel Slide 1 |
|
|
Key_Message_vod 1:
|
Key_Message_vod 1:
|
Key_Message_vod 1:
|
Key_Message_vod 1:
|
|
Multichannel Slide 2 |
|
|
Key_Message_vod 2:
|
Key_Message_vod 2:
|
Key_Message_vod 2:
|
Key_Message_vod 2:
|
Syncing Multi-Product CLM Presentations
When multi-product presentations are synced to CRM and created, each copy is stamped with a unique identifier (VExternal_Id_vod).
Since CLM presentations in CRM created from one multi-product Vault presentation may have the same presentation ID, the gotoSlide, gotoSlideV2, and launchSelector JavaScript methods use the Product_vod and Detail_Group_vod values to navigate to the correct presentation. See the Developer Portal for more information.
If a product is removed from a presentation, the sync expires the copy of the presentation, slides, and key messages created for that product. If the product is added back to the presentation, the expired records are recovered and relinked.
If a new product is added to an existing presentation, the sync creates a copy of the presentation, slides, and key messages for that product.
If a CRM product is added to an existing presentation with one Vault product, and both products have the same external ID, the sync updates the existing presentation, slides, and key messages to reference the CRM product.
Launching the CLM Media Library from the Call Report Online
This feature is available with the production release on August 12, 2021.
Users can launch the online CLM media library via Veeva CRM on Desktop directly from the call report outside of an Engage meeting. This allows users who are meeting with accounts face-to-face or remotely, for example, over Zoom or Microsoft Teams, to share downloaded CLM content via their desktop. This CLM activity is tracked on the call report. See Tracking CLM Key Messages for more information.
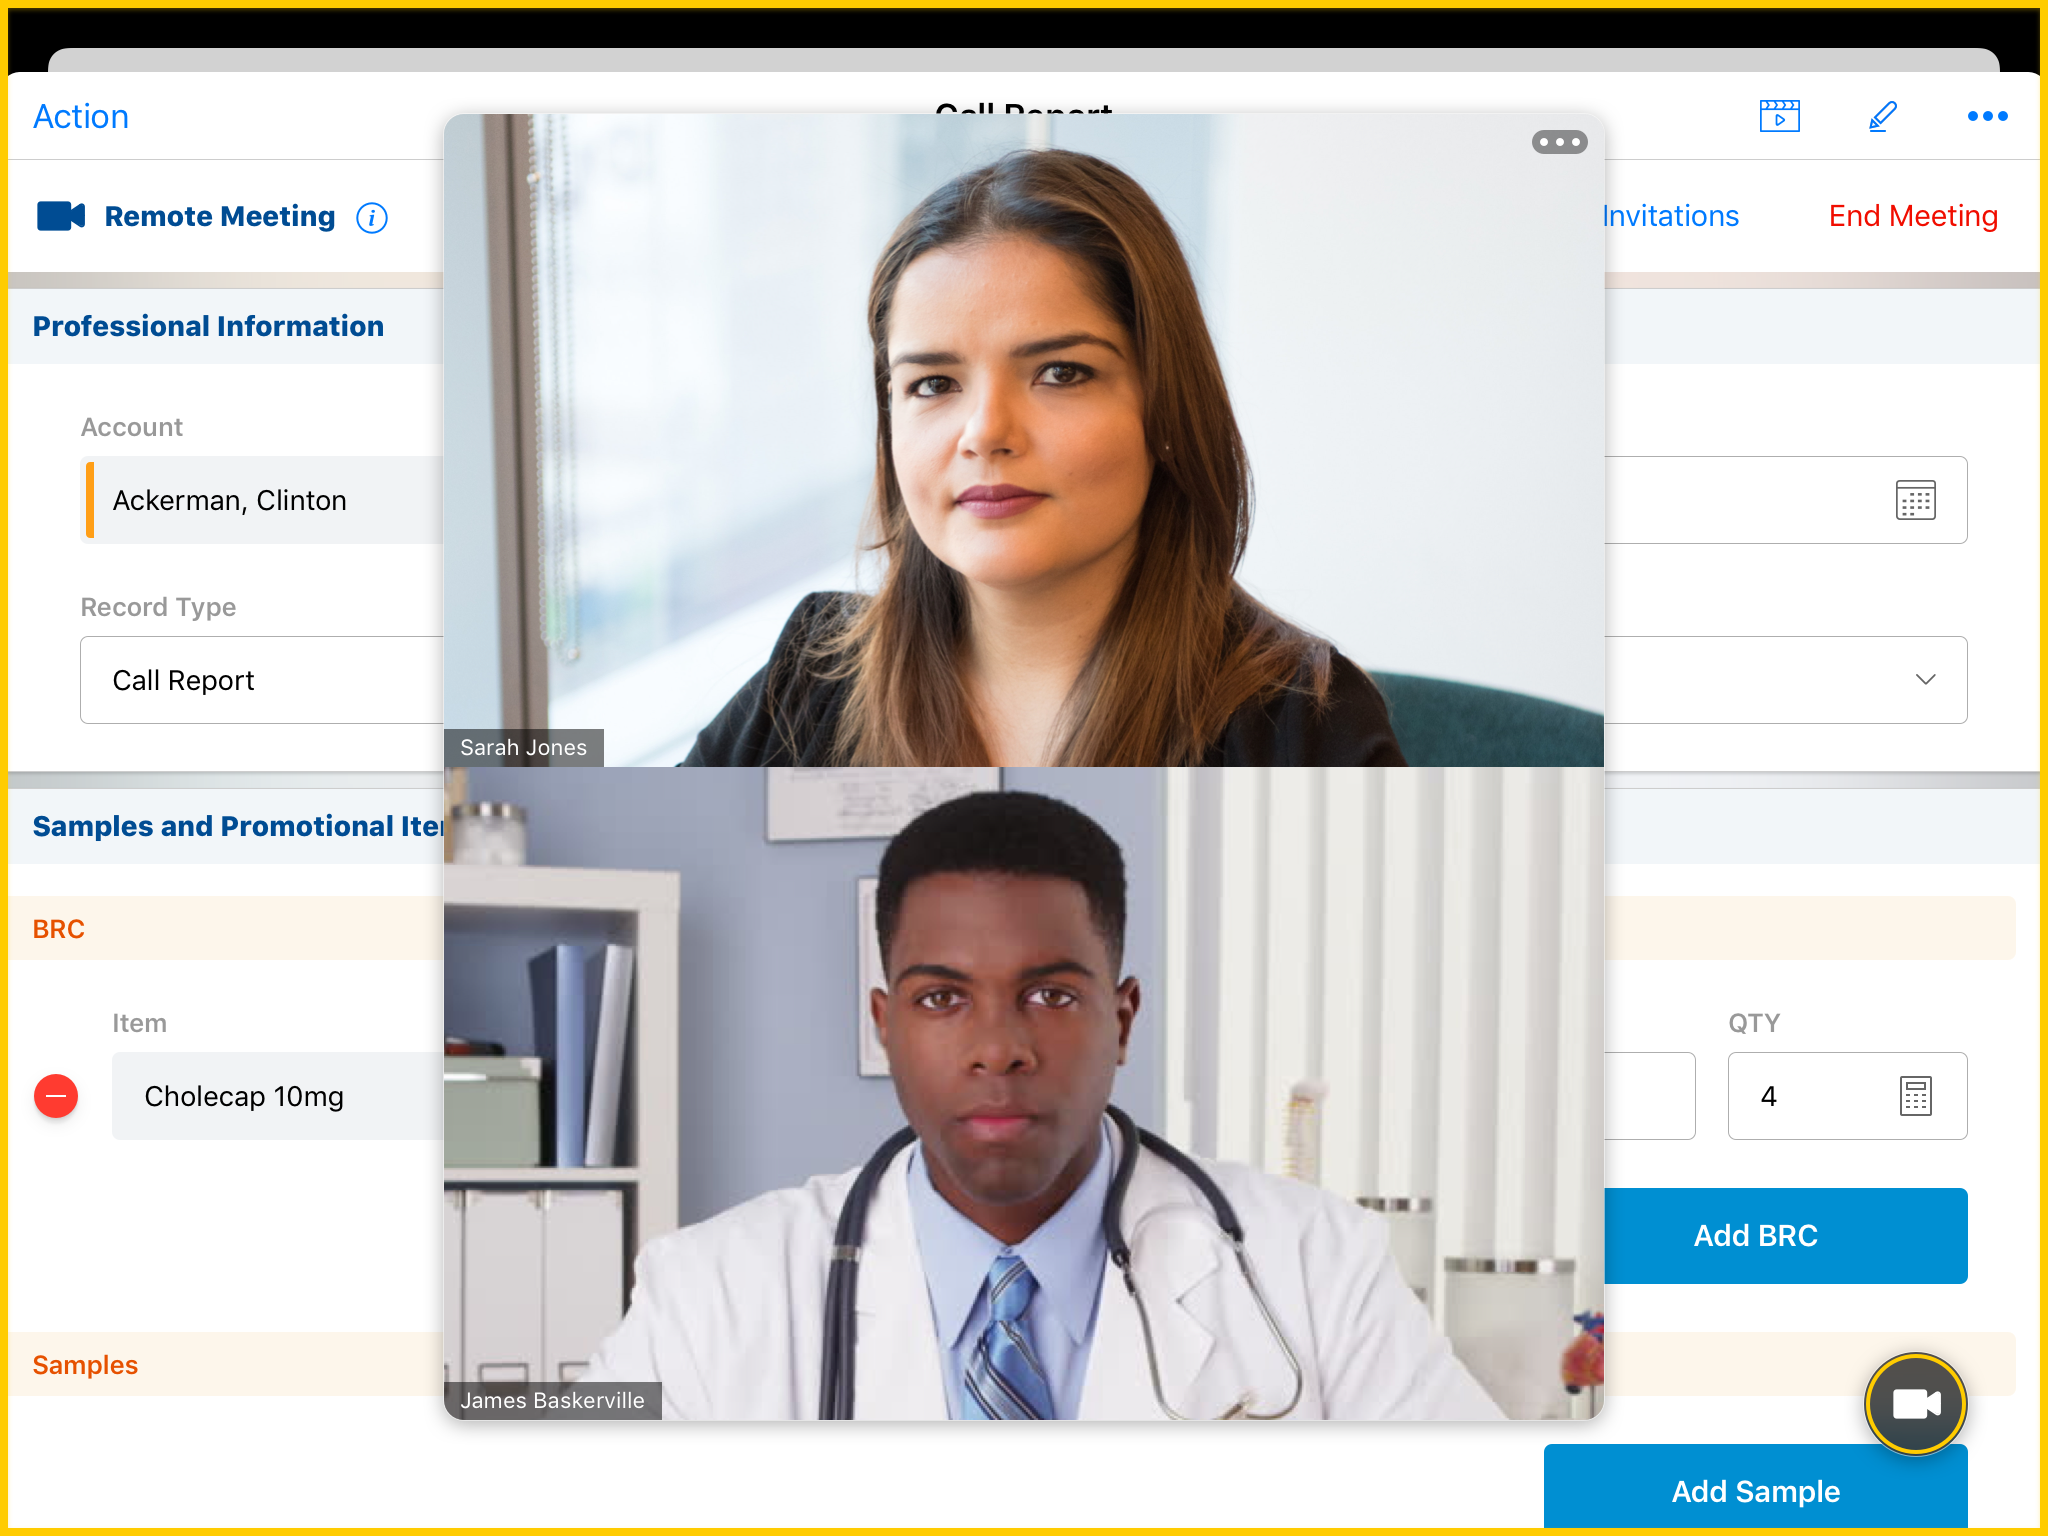
For example, Sarah Jones meets with Dr. Clinton Ackerman remotely using Microsoft Teams to discuss Cholecap. She selects the Start Media button on the call report to view her media library and selects her CLM presentation about Cholecap. The presentation displays on her desktop and she then shares her screen with Dr. Ackerman.
Considerations for Launching CLM Media Library from the Call Report Online
- WebView2 is used to share CLM content for all entry points, including online Engage meetings. This feature overrides the WebView2 setting for Engage.
- WebView2 is only supported on Windows 10 devices
- Microsoft WebView2 Evergreen Runtime automatically installs if not already installed. See Microsoft’s documentation for more information.
- Users must upgrade their devices to .NET version 4.6.2 or higher to share CLM for remote meetings. See Microsoft’s .NET documentation for more information.
- Content creators should follow the CLM Content Creation Guidelines for Veeva CRM on Desktop to adapt CLM content for use across different browsers
Sharing CLM Content from the Online Call Report
After creating a call report online, users can share CLM content during a call in call mode:
Call mode means the app is tracking CLM activity for a specific call.
- Select the More Actions button.
- Select Start Media to display Veeva CRM on app in the foreground. A banner displays at the center top of the screen to indicate call mode. Additionally, the app icon in the system tray displays a blue dot to indicate call mode. Right-select the icon to display a menu with information about the call, as well as buttons to hide the banner or end the call.
- Launch the appropriate content in Normal View.
- Select the Start Slideshow button to display content in fullscreen Presentation View for the app to begin tracking the activity. Activity is tracked only in Presentation View, not in Normal View.
To end call mode:
- Select End from the call mode banner or End Call from the tray icon menu.
- Select End Call in the pop-up window to confirm the end of the call. The call key message data immediately syncs online.
The app remains running in the background even after ending a call or closing the window.
To share CLM content or desktop windows during online Engage meetings, see Sharing Content During Online Engage Meetings.
Engage Meeting
Improved Sharing Experience
This feature is available with the production release on August 12, 2021.
Engage hosts can stop sharing CLM presentations to display full screen video tiles to attendees, enabling a more interactive experience. This replaces the splash screen that displays when CLM content is not displayed to attendees.
For example, Sarah Jones hosts a meeting with Dr. Ackerman and Dr. Adams. For compliance reasons, attendees are not allowed to share their screen during meetings. After Sarah is done sharing content, she selects Stop Share. This displays full screen video tiles to her attendees, who are prevented from sharing their screen despite the fact that Sarah is not sharing her screen.
Hosts can stop sharing by selecting the Stop Share button in the Meeting Controls Menu.
When the host is not sharing, the video ribbon expands to display larger video tiles to the host.
Hosts can resume sharing by selecting the Start Share button in the Meeting Controls Menu.
If the host is viewing a CLM presentation when they select the Start Share button, the CLM presentation immediately shares to attendees. Otherwise, the splash screen displays to attendees.
Enhanced Engage Meeting Attendance Tracking
This feature is available with the production release on August 12, 2021.
Engage Attendance Tracking directly associates meeting attendees with their respective records in CRM, while also providing more attendance information, for example, an attendee’s IP Address and the meeting’s engagement minutes. This information is available in CRM as it becomes available from Zoom, without needing to submit the call report first, making information more useful and more available to users who review attendance information.
For example, Sarah Jones schedules an Engage meeting with Dr. Ackerman and Dr. Adams. When Sarah starts the meeting, Dr. Ackerman and Dr. Adams both join using their provided URLs. When the meeting ends and is processed, three Remote Meeting Attendees records are created: one for Sarah, one for Dr. Ackerman, and one for Dr. Adams. Each of these records directly references the corresponding User record (in the case of Sarah Jones) and Account records (in the cases of Dr. Ackerman and Dr. Adams).
Considerations for Enhanced Engage Meeting Attendance Tracking
- This feature only applies to Remote_Meeting_vod records where the VExternal_ID_vod field is populated
- The Call_vod field on created Remote_Meeting_Rating_vod records do not populate when this feature is enabled
- This feature does not apply to attendees joining an Engage meeting via Zoom
Tracking Engage Meeting Attendance
Attendance information about an Engage meeting is located in the resulting Remote_Meeting_vod record, as well as all associated Remote_Meeting_Attendee_vod records.
Admins can review the last ten runs of the post-processing job from the Attendance Report Process History section of the Engage Meeting Process Administration tab. The Type column of this section can have one of two values:
- Meetings with VExternal ID – All Remote_Meeting_vod and Remote_Meeting_Attendee_vod fields are processed as they are via the existing Engage Post-Processing job, with the following exceptions:
- The Call_vod and Participant_ID_vod fields of all associated attendee records do not populate
- The following additional fields populate if the integration user has FLS edit permission to them:
- The Engagement_Mintutes_vod field on the Remote_Meeting_vod object
- The Account_vod field on the Remote_Meeting_Attendee_vod object
- The IP_Address_vod field on the Remote_Meeting_Attendee_vod object
- Meetings without VExternal ID – The meeting is processed via the existing Engage Post-Processing job
Each run of the post-processing job generates two rows, one for each Type.
If the integration user does not have FLS edit permission to the VExternal_ID_vod field on the Remote_Meeting_vod object, an error displays in Meetings with VExternal ID-type rows.
Meetings where only the host joined have a Meeting_Outcome_Status_vod field of Meeting Without Attendees. Remote_Meeting_Attendee_vod records for hosts of these meetings are created, with the following fields left blank:
- IP_Address_vod
- Device_vod
- Network_Type_vod
Additionally, the Name field populates with the Zoom-registered username, not their name in CRM.
Information Stored in the Remote_Meeting_vod Record
When an Engage meeting is scheduled, a unique ID for the meeting is generated and stamped on the VExternal_Id_vod field of the resulting Remote_Meeting_vod record.
The Meeting_Outcome_Status_vod picklist populates as soon as enough data is available to determine the status. For example, as soon as Zoom reports that an external attendee has joined a meeting, the corresponding Remote_Meeting_vod record's meeting outcome updates to Meeting Started with Attendees when the processing job next runs, regardless of if the call has been submitted or not.
Even after the meeting outcome populates, the Attendance_Report_Process_Status_vod field remains blank for two days after the related call is submitted. This is to ensure all relevant data is available before the field is set.
After the Engage meeting is processed, the Engagement_Minutes_vod field populates with the amount of time, in minutes, that the host or user attendee and at least one external attendee was present in the meeting.
For example, Sarah Jones begins her Engage meeting. The following attendees join her meeting at the following times:
- Sarah spends two minutes in the meeting by herself. These minutes are not counted as engagement minutes.
- Larry Lakes, a user attendee, joins the meeting. Sarah and Larry spend two minutes in the meeting as the only attendees. These minutes are not counted as engagement minutes.
- Dr. Clinton Ackerman joins the meeting. Sarah, Larry, and Dr. Ackerman spend three minutes in the meeting. These minutes are counted as engagement minutes.
- Sarah temporarily leaves the meeting for one minute, leaving Larry and Dr. Ackerman in the meeting. This minutes is counted as an engagement minute.
- When Sarah rejoins, her, Larry, and Dr. Ackerman spend another four minutes in the meeting before the meeting ends. These minutes are counted as engagement minutes.
- Four minutes later, the meeting ends. These minutes are counted as engagement minutes.
The number of Engagement Minutes for this meeting is 8, with the two minutes Sarah spent by herself in the meeting, as well as the two minutes where only Sarah and Larry were in the meeting not counting towards Engagement Minutes.
Information Stored in Remote_Meeting_Attendee_vod Records
When Remote_Meeting_Attendee_vod records are generated by the Engage meeting & Webinar Process and associated with the corresponding Remote_Meeting_vod record, the following fields populate:
- Account_vod – Populates for all records corresponding to attendees who joined via an Engage link. References the account corresponding to the attendee. This field is left blank if the attendee is the host or is a user attendee.
-
IP_Address_vod – References the IP address of the device the attendee used to join the meeting
This field is left blank if the integration user does not have FLS edit permission to the field at the time the process runs.
Attendance Tracking Reports and Dashboard
Attendance information about an Engage meeting is located in the resulting Remote_Meeting_vod record, as well as all associated Remote_Meeting_Attendee_vod records.
Admins can review the last ten runs of the post-processing job from the Attendance Report Process History section of the Engage Meeting Process Administration tab. The Type column of this section can have one of two values:
- Meetings with VExternal ID – All Remote_Meeting_vod and Remote_Meeting_Attendee_vod fields are processed as they are via the existing Engage Post-Processing job, with the following exceptions:
- The Call_vod and Participant_ID_vod fields of all associated attendee records do not populate
- The following additional fields populate if the integration user has FLS edit permission to them:
- The Engagement_Mintutes_vod field on the Remote_Meeting_vod object
- The Account_vod field on the Remote_Meeting_Attendee_vod object
- The IP_Address_vod field on the Remote_Meeting_Attendee_vod object
- Meetings without VExternal ID – The meeting is processed via the existing Engage Post-Processing job
Each run of the post-processing job generates two rows, one for each Type.
If the integration user does not have FLS edit permission to the VExternal_ID_vod field on the Remote_Meeting_vod object, an error displays in Meetings with VExternal ID-type rows.
Meetings where only the host joined have a Meeting_Outcome_Status_vod field of Meeting Without Attendees. Remote_Meeting_Attendee_vod records for hosts of these meetings are created, with the following fields left blank:
- IP_Address_vod
- Device_vod
- Network_Type_vod
Additionally, the Name field populates with the Zoom-registered username, not their name in CRM.
The Engage Attendee Tracking Dashboard
The Engage Attendee Tracking dashboard enables admins to quickly see several important metrics regarding attendance, as well as monitor the overall health of Engage in the org. Data on this dashboard can be filtered to only show data within the last 30 days, the last quarter, or year-to-date.
This dashboard is only available in Lightning-enabled orgs.
This dashboard contains the following four rows:
- Meetings with Attendees – Engage meetings with at least one attendee
- Meetings with Internal Attendees Only – Engage meetings with only user attendees
- Meetings not Started, not Scheduled, or Started Without Attendees – Engage meetings with one of the following Meeting_Outcome_Status_vod values:
- Meeting_Not_Scheduled_vod
- Meeting_Not_Started_vod
- Meeting_Started_Without_Attendees_vod
- Meetings Started, Details not Available – Engage meetings with a Meeting_Outcome_Status_vod of Meeting_Started_Details_Not_Available_vod
Each of these rows contains four widgets that display the following metrics for that row:
- Number of Instances – The number of Engage meetings with the corresponding metric. For example, the number of Engage meetings with at least one attendee during the selected timeframe
- Number of Instances by Month – A line chart of Engage meetings with the corresponding metric, grouped by month
- Percent of Instances – The percent of Engage meetings with the corresponding metric
- Percent of Instances by Month – A line chart of the percent of Engage meetings with the corresponding metric, grouped by month
Viewing the CLM Media Library from the CRM Engage App Online
When viewing the CLM media library online via the CRM Engage app, users can add labels and sort presentations by directory. Additionally, users can search for presentations using search terms matching presentation keywords and descriptions.
Additional Zoom URL Token Language Support
The {{insertEngageAndZoomJoinURL[language_code]}} token supports the following additional language codes:
- be – Belarusian
- bs – Bosnian
- et – Estonian
- fl – Flemish
- ga – Gaeilge (Irish Gaelic)
- ka – Georgian
- hr – Croatian
- iw – Hebrew
- lv – Latvian
- lt – Lithuanian
- mk – Macedonian
- no – Norwegian
- pt_PT – Portuguese (Portugal)
- sl – Slovenian
- sr – Serbian
See Adding the Zoom URL to Approved Email Templates for more information on adding the {{insertEngageAndZoomJoinURL[language_code]}} token to Approved Email content.
Events Management
Alternative Hosts for Virtual Events
Event organizers can designate Event Team Members as alternative hosts. Alternative event hosts can begin and run virtual events with the same privileges as the event host, enabling organizers to avoid rescheduling and canceling the event if the organizer cannot host an event, for example, due to illness or scheduling conflicts.
For example, Sarah Jones schedules a virtual event, invites several attendees, then adds Alice Adams as an alternative host. Before the virtual event begins, Sarah becomes sick and is not able to host the event. Rather than reschedule the event, Alice navigates to the event, starts the virtual event, then runs the event as the host.
Considerations for Alternative Hosts for Virtual Events
- Alternative hosts must be an Events Management user and have a license for Engage
- Alternative hosts must be an Event Team Member with a Team_Member_vod field referencing an active user
- Alternative hosts cannot replace the original host as the host of the virtual event
- If a user is added as both an attendee and Event Team Member, the user will be prioritized as an Alternative Host and is not assigned a Participant URL
- If a virtual event is started by an alternative host, and the original host later joins, the original host is given the option to reclaim hosting privileges
- Multiple users can be designated as alternative hosts for the same virtual event
- When Tracking Virtual Event Attendance is enabled, hosts and alternative hosts are tracked in addition to speakers and attendees
- This feature is supported in Lightning for Events Management
Scheduling Virtual Events with Alternative Hosts
When an event organizer schedules a virtual event, their corresponding EM_Event_Team_Member_vod record is updated with a Virtual_Role_vod of Host_vod.
If an EM_Event_Team_Member_vod does not exist for the host, a corresponding record is automatically added to the event with the Virtual_Role_vod of Host_vod
To add alternative hosts for the virtual event:
- Navigate to the appropriate EM_Event_vod record.
- Navigate to the list of Event Team Members.
- Select Alternative_Host_vod in the Virtual_Role_vod picklist for all appropriate team members.
The Virtual_Role_vod picklist only displays for team members with an Event_Team_Member_Type_vod field of User_vod.
Starting a Virtual Event as an Alternative Host
To start a virtual event as an alternative host:
- Navigate to the appropriate EM_Event_vod record.
- Select the Start_Webinar_vod button, Start Engage.
Alternative event hosts run virtual events with similar privileges as the event host. See Hosting a Virtual Event for more information.
|
Functionality |
Host |
Alternative Host |
|---|---|---|
|
Meeting Controls |
||
|
Start the virtual event |
|

|
|
Mute/unmute themselves |
|
|
|
Start/stop their video |
|
|
|
Share screen (depending on device) |
|
|
|
View participants list |
|
|
|
Chat with participants |
|
|
|
End meeting |
|
* |
|
Waiting Room, Mute on Entry, Lock Meeting |
|
|
|
Managing participants |
||
|
Mute or Ask to unmute participants |
|
|
|
Stop participant's video |
|
|
|
Ask participant to start video |
|
|
|
Spotlight/Pin a video |
|
|
|
Promote participant to host or alternative host |
|
|
|
Control participant Chat privileges |
|
|
|
Remove participants |
|
|
|
Rename participants |
|
|
|
Mute controls for all participants |
|
|
|
Put participants in Waiting Room |
|
|
|
Admit participants from Waiting Room |
|
|

*Only the meeting host can end the meeting. If an alternative host started the meeting as the host and the original host did not join, the alternative host can end the meeting. If the original host joined and reclaimed hosting privileges, only the original host can end the meeting.
Event Speaker Rules
Event Speaker rules enable admins to set up guidelines and policies when adding speakers to events. These guidelines and policies provide compliance, more effective events, controlled spending, and limits to speakers added to events.
Several types of Event Speaker rules exist, each of which can be controlled by country and event type:
- Per Speaker Engagement Limit Rule – Limits the number of events a speaker can speak at per event type
- Cross-Event Per Speaker Engagement Limit Rule – Limits the number of events a speaker can speak at across multiple event types
- Speaker Attendance By Expense Cap Rule – Limits a speaker's attendance based on expense cap
- Per Event Speaker Ratio Rule –Limits the number of speakers that can be added to an event based on a speakers-to-attendees ratio
- Per Event Speaker Limit Rule – Defines the minimum and maximum number of speakers that can be added to an event
- Per Event Speaker Expense Limit Rule – Limits the expenses of an event that can be attributed to an event speaker
- Speaker Attendance Qualification – Limits speakers from being added as attendees to events they are qualified to speak at
- Speaker Attendance By Product Cap Rule – Limits a speaker’s attendance based on product-specific cap
These rules can be configured to either warn event organizers of violations or prevent them from proceeding until violations are addressed.
See Examples of Event Speaker Rules for detailed examples of each of these types of rules.
Creating Event Speaker Rules
All Event Rules are created from the Event Business Rules tab. The selected record type of the EM_Event_Business_Rule_vod record determines which fields admins must populate:
- Navigate to the Event Business Rules tab.
-
Create an Event Rule with the appropriate record type. This determines the type of rule:
- EM_Per_Speaker_Engagement_Limit_Rule_vod
- EM_Cross_Event_Per_Speaker_Engagement_Limit_Rule_vod
- EM_Speaker_Attendance_Expense_Cap_Rule_vod
- EM_Per_Event_Speaker_Ratio_Rule_vod
- EM_Per_Event_Speaker_Limit_Rule_vod
- EM_Per_Event_Speaker_Expense_Limit_Rule_vod
- EM_Speaker_Attendance_Qualification_Rule_vod
- Speaker_Attendance_Product_Cap_Rule_vod – Designating Speaker Caps by Product must be enabled to use this type of rule
- Select Next.
-
Populate the following fields:
- Name
- Warning_Type_vod – Select either Hard Warning or Soft Warning. See Warning Text and Tokens for more information.
- Warning_Text_vod – Displays the Veeva Message that displays if this rule is violated. See Warning Text and Tokens for more information.
- Comment_Required_vod – Only displays if the Warning Type is Soft Warning. Select one of the following options:
- Required – Organizers must leave a comment when dismissing a soft warning
- Optional – Organizers may leave a comment when dismissing a soft warning
- Hidden – The comment box does not display
- Run_Rule_Event_Action_vod – Enter the appropriate button name to run the rule whenever the event organizer selects the button. Enter only one button name and do not use any of the following buttons:
- Attendee_Reconciliation_vod
- Cancel_Event_vod
- Generate_Invitations_vod
- Generate_Sign_In_vod
- Manage_Attendees_vod
- Manage_Attendees_Hub_vod
- Preview_Event_QR_Code_vod
- Record_a_Call_vod
- Reschedule_vod
- Schedule_Engage_vod
- Send_Email_vod
- Start_Webinar_vod
- View_Signatures_vod
-
Global_Rule_vod – Applies the rule to all countries, regardless of any countries associated via Event Business Rule Configuration records.
This field is not used with the EM_Per_Event_Speaker_Expense_Limit_Rule_vod record type.
-
Populate the following additional fields based on the selected record type:
Record Type
Additional Field
Description
EM_Per_Speaker_Engagement_Limit_Rule_vod
Speaker_Status_vod
Restricts rule to EM_Event_Speaker_vod records with matching Status_vod fields. Uses the following syntax:
Event Status 1:Speaker Status 1,Speaker Status 2;;Event Status 2:Speaker Status 1
Per_Event_Topic_vod
If selected, applies the defined Limit_Quantity_vod and Rolling_Period_vod fields individually for a topic.
For example, a speaker can only speak at 2 events in a calendar year per topic.
If this checkbox is not selected, the Rolling_Period_vod fields apply to events across all topics.
Date_Threshold_Type_vod
Defines the timeframe for thresholds for the rule.
Select one of the following:
- Rolling_vod – See Rolling_Period_vod for more information
- Calendar_Month_vod – States that the restriction applies to events before and after the scheduled event within the same calendar month
- Calendar_Year_vod – States that the restriction applies to events before and after the scheduled event within the same calendar year
Rolling_Period_vod
Defines, in days, the rolling period.
This field applies the defined number of days both before the scheduled event and after the scheduled event.
This field should only be populated if Rolling_vod was selected for Date_Threshold_Type_vod.
EM_Cross_Event_Per_Speaker_Engagement_Limit_Rule_vod
Speaker_Status_vod
Restricts rule to EM_Event_Speaker_vod records with matching Status_vod fields. Uses the following syntax:
Event Status 1:Speaker Status 1,Speaker Status 2;;Event Status 2:Speaker Status 1
Limit_Quantity_vod
Defines the number of events that a speaker can have previously spoken at before violating the rule.
Per_Event_Topic_vod
If selected, applies the defined Limit_Quantity_vod and Rolling_Period_vod fields individually for a topic.
For example, a speaker can only speak at 2 events in a calendar year per topic.
If this checkbox is not selected, the Rolling_Period_vod fields apply to events across all topics.
Date_Threshold_Type_vod
Defines the timeframe for thresholds for the rule.
Select one of the following:
- Rolling_vod – See Rolling_Period_vod for more information
- Calendar_Month_vod – States that the restriction applies to events before and after the scheduled event within the same calendar month
- Calendar_Year_vod – States that the restriction applies to events before and after the scheduled event within the same calendar year
Rolling_Period_vod
Defines, in days, the rolling period.
This field applies the defined number of days both before the scheduled event and after the scheduled event.
This field should only be populated if Rolling_vod was selected for Date_Threshold_Type_vod.
EM_Speaker_Attendance_Expense_Cap_Rule_vod
Percent_Threshold_vod
Defines the threshold percentage for when the warning displays. This applies when the percent of committed cap remaining compared to the annual cap is less than the defined value.
EM_Per_Event_Speaker_Ratio_Rule_vod
Speaker_Status_vod
Restricts rule to EM_Event_Speaker_vod records with matching Status_vod fields. Uses the following syntax:
Speaker Status 1;;Speaker Status 2
Attendee_Account_Type_vod
Restricts rule to attendees with matching Attendee_Account_Type_vod fields on the EM_Attendee_vod object.
Attendee_Status_vod
Defines which attendees must be included for calculations, based on Event Status and Attendee Status. Use the following syntax:
Attendee Status 1;;Attendee Status 2
For example, Attended_vod;;Signed_vod
Leave this field blank to apply the rule to all attendees, regardless of status.
EM_Per_Event_Speaker_Limit_Rule_vod
Speaker_Status_vod
Restricts rule to EM_Event_Speaker_vod records with matching Status_vod fields. Uses the syntax:
Speaker Status 1;;Speaker Status 2
EM_Per_Event_Speaker_Expense_Limit_Rule_vod
Expense_Category_vod
Restricts the rule to either Estimate or Actual Expenses.
Expense_Type_vod
Use the lookup field to select the appropriate EM_Expense_Type_vod record.
Expense Estimates are not created if the selected Expense Type is not active or is a child of another EM_Expense_Type_vod record. Per Event Expense Limits and Per Event Attendee Expense Limit rules can use active Expense Types that are children of other Expense Types if the Expense Category is Actual.
Event_Status_vod
Restricts rule to run only on events in a defined Event Status.
Use the following format:
Status1;;Status2
For example,
Approved_vod;;Pending_Approval_vod
Leave this field blank to apply the rule to all events.
Speaker_Attendance_Product_Cap_Rule_vod
Percent_Threshold_vod
Defines the threshold percentage for when the warning displays. This applies when the percent of committed cap remaining compared to the annual cap is less than the defined value.
EM_Speaker_Attendance_Qualification_Rule_vod type rules do not require any additional fields.
- Select Save.
Creating Event Speaker Rule Configurations
After the event rule is created, admins must create an associated EM_Business_Rule_Configuration_vod record to determine which event type, country, and timespan the rule should apply to.
To associate event rules to EM_Business_Rule_Configuration_vod records, create a EM_Business_Rule_Configuration_vod record from the Business Rule Configurations related list of the appropriate business rule with the following field values:
- Event_Business_Rule_vod – Automatically populates with the appropriate event rule
- Event_Type_vod – Enter the appropriate EM_Event_vod record type the event rule applies to
- Country_vod – Use the lookup to select the appropriate Country_vod record. This field does not display if the Global_Rule_vod check box was selected and is not supported with EM_Cross_Event_Per_Speaker_Engagement_Limit_Rule_vod type rules.
- Rule_Start_Date_vod – Defines the start of the active period of the rule
- Rule_End_Date_vod – Defines the end of the active period of the rule
- Limit_Quantity_vod – Restricts the number of events spoken at before a speaker is ineligible during the specified time period. Only applies to the following record types:
- EM_Per_Speaker_Engagement_Limit_Rule_vod
- EM_Per_Event_Speaker_Ratio_Rule_vod
- Minimum_Quantity_vod and Maximum_Quantity_vod – Only applies to EM_Per_Event_Speaker_Limit_Rule_vod type rules. Used to establish the minimum and maximum number of speakers allowed for an event.
- Minimum_Spend_Limit_vod and Maximum_Spend_Limit_vod – Only applies to EM_Per_Event_Speaker_Expense_Limit_Rule_vod type rules. Used to establish the minimum and maximum amount of expenses that can be attributed to a speaker.
Admins can create different limits for different countries by creating additional EM_Business_Rule_Configuration_vod records.
Only one business rule configuration can be active for each combination of Event_Type_vod, Event_Business_Rule_vod, and Country_vod.
Defining the Run Order of Event Speaker Rules
Many Event Speaker Rules may be configured to run on the same Event Action, for example when selecting Submit for Approval. If multiple Attendance Rules are triggered at once, rules with a Warning Type of Hard Warning run first.
When all rules have the same Warning Type, relevant rules run in the following order:
- Speaker Attendance Qualification Rules
- Per Speaker Engagement Limit Rule
- Cross-Event Per Speaker Engagement Limit Rule
- Speaker Attendance By Expense Cap Rule
- Speaker Attendance By Product Cap Rule
- Per Event Speaker Limit Rule
- Per Event Speaker Ratio Rule
- Per Event Speaker Expense Limit Rule
It is possible that a speaker, expense, attendee, or event may be evaluated by multiple rules, some of which may conflict with one another in some way. The following sections detail the specific logic for these instances.
Logic for Conflicting Per Event Speaker Ratio Rules
For Per Event Speaker Ratio rules, rules with and without a defined value for Attendee Account Type run at the same time. For example, three Per Event Speaker Ratio Rules are created with identical values, except for the Attendee Account Types field:
- Rule A – Prescribers_vod
- Rule B – KOL_vod
- Rule C – The field has been left blank and applies to any type of attendee
All three rules have limit quantities of 10 and one speaker is added to the event. All three rules run against the same event, with the following violations based on the distribution and number of attendees:
|
Example 1 |
Example 2 |
Example 3 |
Example 4 |
|
|---|---|---|---|---|
|
Number of Prescribers |
10 |
10 |
10 |
0 |
|
Number of KOLs |
10 |
0 |
10 |
10 |
|
Other attendees |
10 |
10 |
0 |
0 |
|
Rules Violated |
None |
Rule B |
None |
Rule A |
Logic for Conflicting Per Event Speaker Expense Limit Rules
If multiple Per Event Speaker Expense Limit rules apply to the same event, rules with a defined value in the Event Status field take precedence over rules with an empty Event Status field.
For example, two Per Event Speaker Expense Limit Rules are created, both of which are triggered by the Verify Expense button:
- Rule A has an Event Status field of Planning_vod and a spend limit range of $0 - $500
- Rule 2 has an empty Event Status field and a spend limit range of $0 - $1000
When the event is in a status of Planning, selecting Verify Expenses only runs Rule A. When the event is updated from Planning to Approved, selecting Verify Expenses only runs Rule B.
Logic for Conflicting Date Threshold Types
When multiple rules of the same type but with different Date Threshold values apply to the same event, all rules run and the event organizer sees all applicable warnings.
Previewing Event Speaker Rules
Event organizers are able to preview the result of the following types of Event Speaker Rules whenever they add a speaker to an event:
- Per Speaker Engagement Limit Rule
- Cross-Event Per Speaker Engagement Limit Rule
- Speaker Attendance By Expense Cap Rule
- Speaker Attendance By Product Cap Rule
If a preview of a rule results in a violation, organizers can still add the speaker to the event, regardless of if the rule is a soft or hard warning. Soft or hard warning behavior only applies to when the rule's defined Run Rule on Event Action is selected.
When event organizers add a speaker to an event, they can preview any relevant Speaker Attendance Qualification rules.
Additionally, relevant Per Event Speaker Expense Limit Rules are previewed whenever the event organizer enters a speaker expense.
If an added speaker violates any rule, a warning modal displays with the name of the speaker and the warning text.
From this modal, event organizers can review potential violations and remove speakers by selecting the check box next to the speaker’s name and selecting Continue.
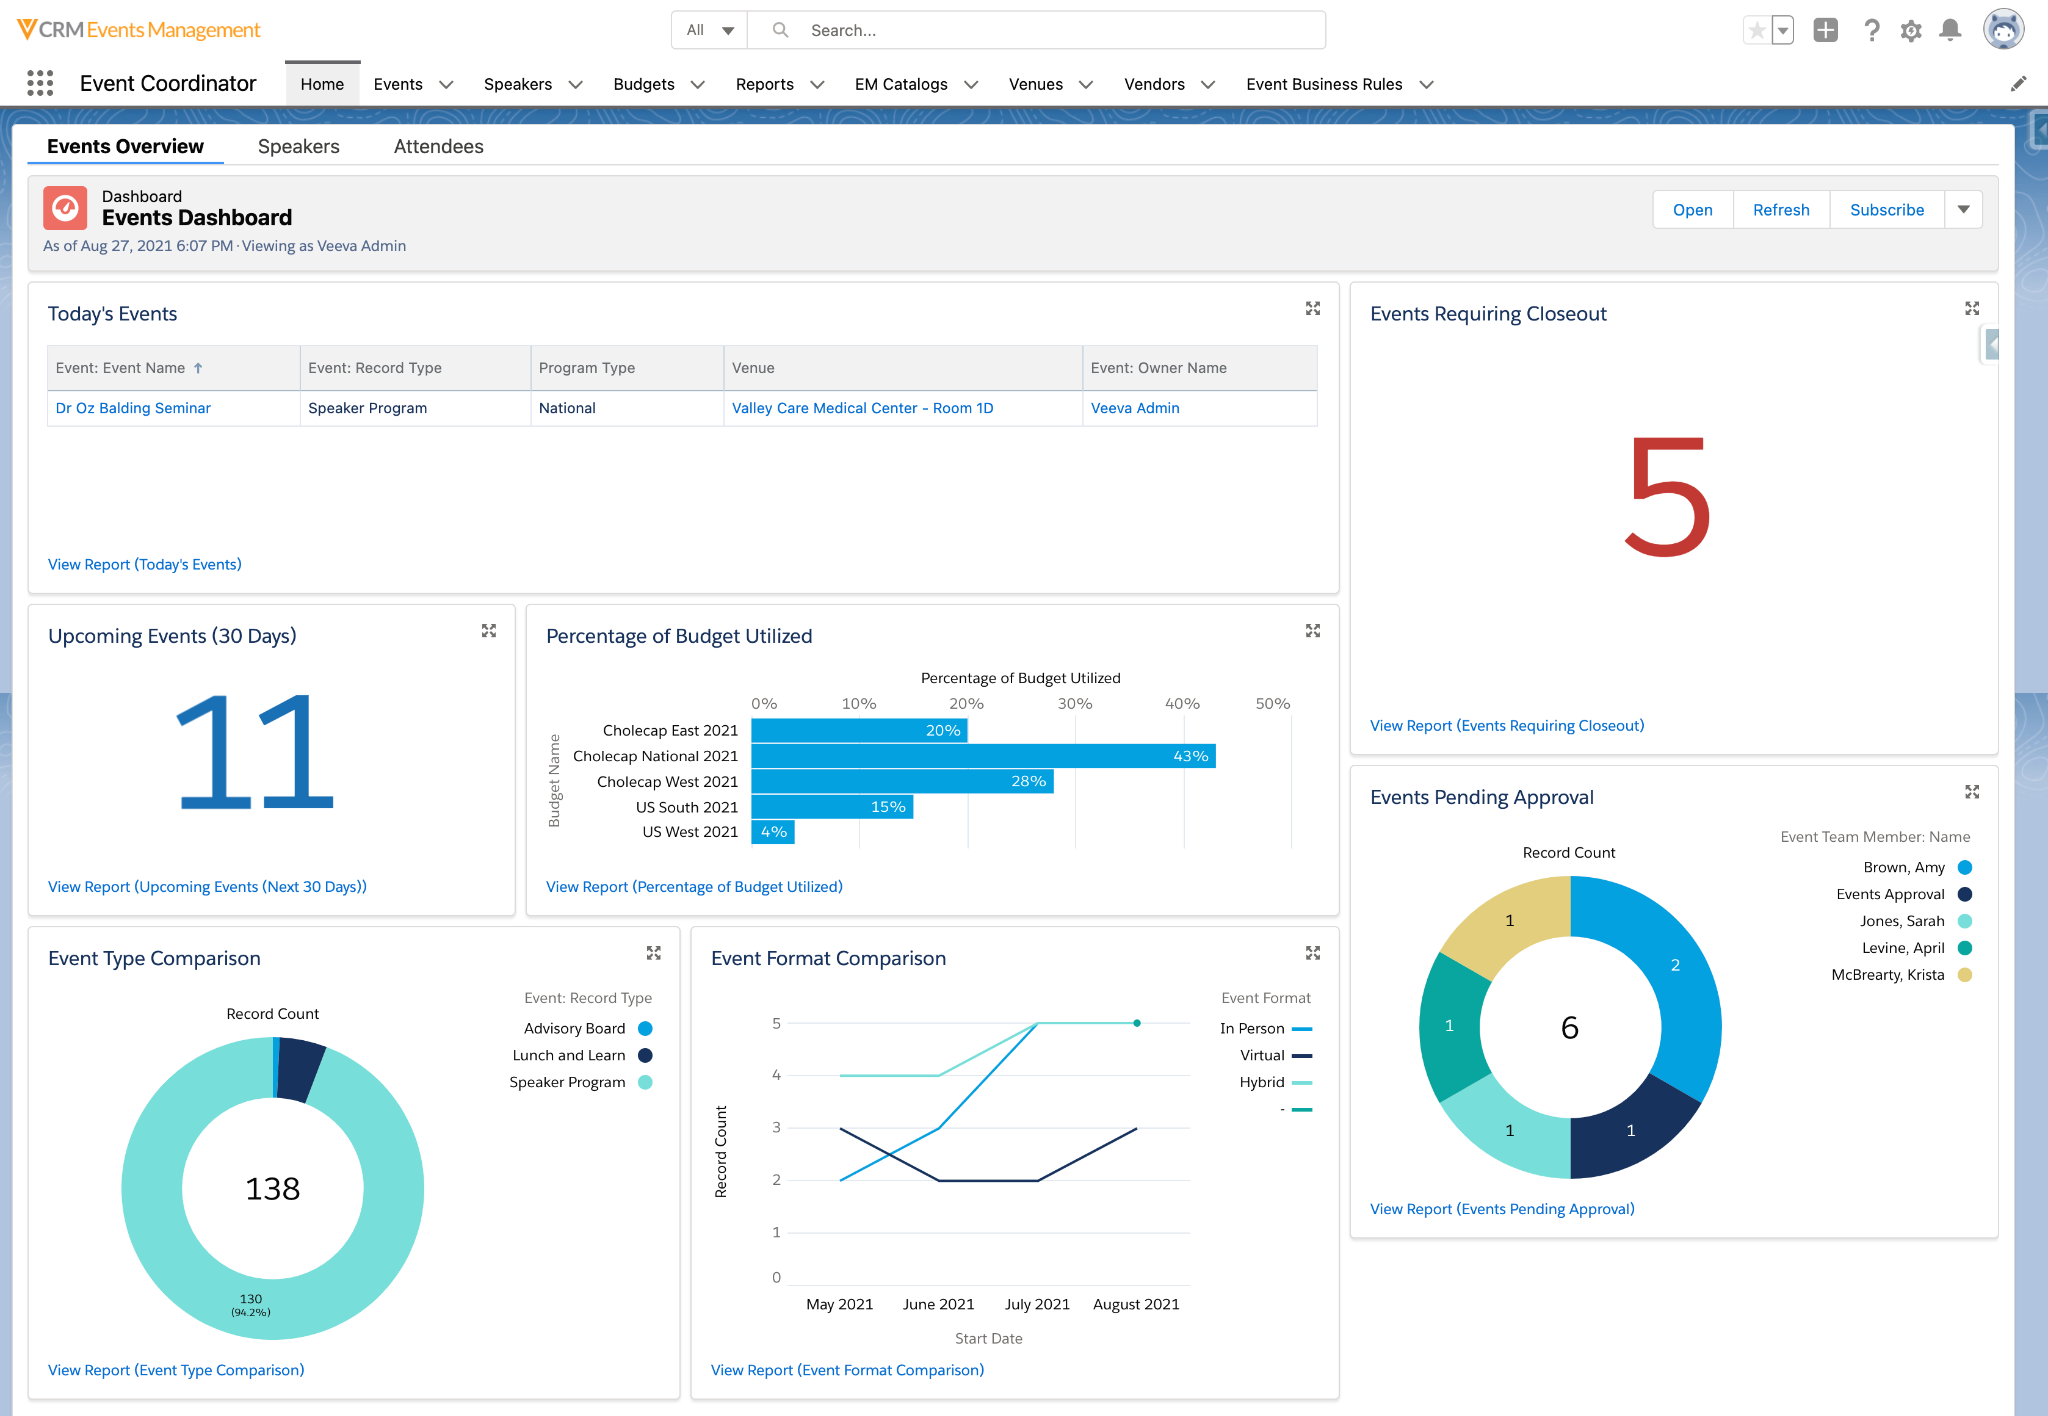
Event Coordinator Lightning Business App
The Event Coordinator app provides home office users like event planners, coordinators, compliance, and operations quick and easy access to information relevant to events, including the following:
- Upcoming and past events pending close out
- Events by type and format
- Percentage of budgets used
- Events pending approval
- Speaker training and utilization
- Attendee reports
The Event Coordinator profile must be present in the org (with or without users associated to them). If the profile does not exist, admins can deploy the package containing Veeva's out-of-the-box Event Coordinator profile, which includes all the necessary permissions for the app, or configure a custom profile.
When planning an event from the Event Coordinator App, key information in the logistics process, for example, attendee status and remaining invitations to send, displays inline with the event.
The Event Coordinator App includes the following tabs:
- Home – Displays a dashboard for all of the organization’s events
- Event Lists – Enables coordinators to view upcoming events, as well as past events requiring closeout activities
- Speakers – Displays a comprehensive view of all speakers, including their training, qualifications, and utilization
- Reports – Access to standard reports and coordinator-specific reports
- Budgets & Expenses – Displays budgetary expenditures, organized by event type, cost, and territory
- Materials – Displays tracking and usage metrics on the types of materials used in events
- Tabs for each of the following objects:
- EM_Event_vod
- Contract_vod
- Sent_Email_vod – Requires Using Approved Email for Events Management in order to display
- EM_Venue_vod
- EM_Vendor_vod
The app also includes Compact Layouts, which can be assigned to the object Lightning pages.
The app also includes the optional Event Coordinator profile. This profile provides the necessary access and permissions to use the app. Admins can provide access to the app in custom profiles by granting the necessary tab permissions. Custom profiles should have the following folders shared to display business app information:
- Event Coordinator Dashboards
- Event Coordinator Reports
MyInsights Studio
Querying Nitro Data from MyInsights Studio
This feature is available with the production release on August 12, 2021.
Users can use the Nitro Query data element in MyInsights Studio to integrate Nitro data into custom MyInsights content.
Order Management
Changing Order Line Column Widths
Admins can adjust column widths for the Order Lines fields on the Order_Line_vod page layout to ensure longer field labels are adequately displayed. Field labels can contain information to guide users on which products to sell.
The Product_vod field column width cannot be changed.
For example, an admin added a new column to the Order page for the Suggested Retail Price, information that can help users negotiate orders. Because the field label was long it did not fully display on the page. The admin adjusted the column width for that field so that the label displays fully on the Order Lines page for users.
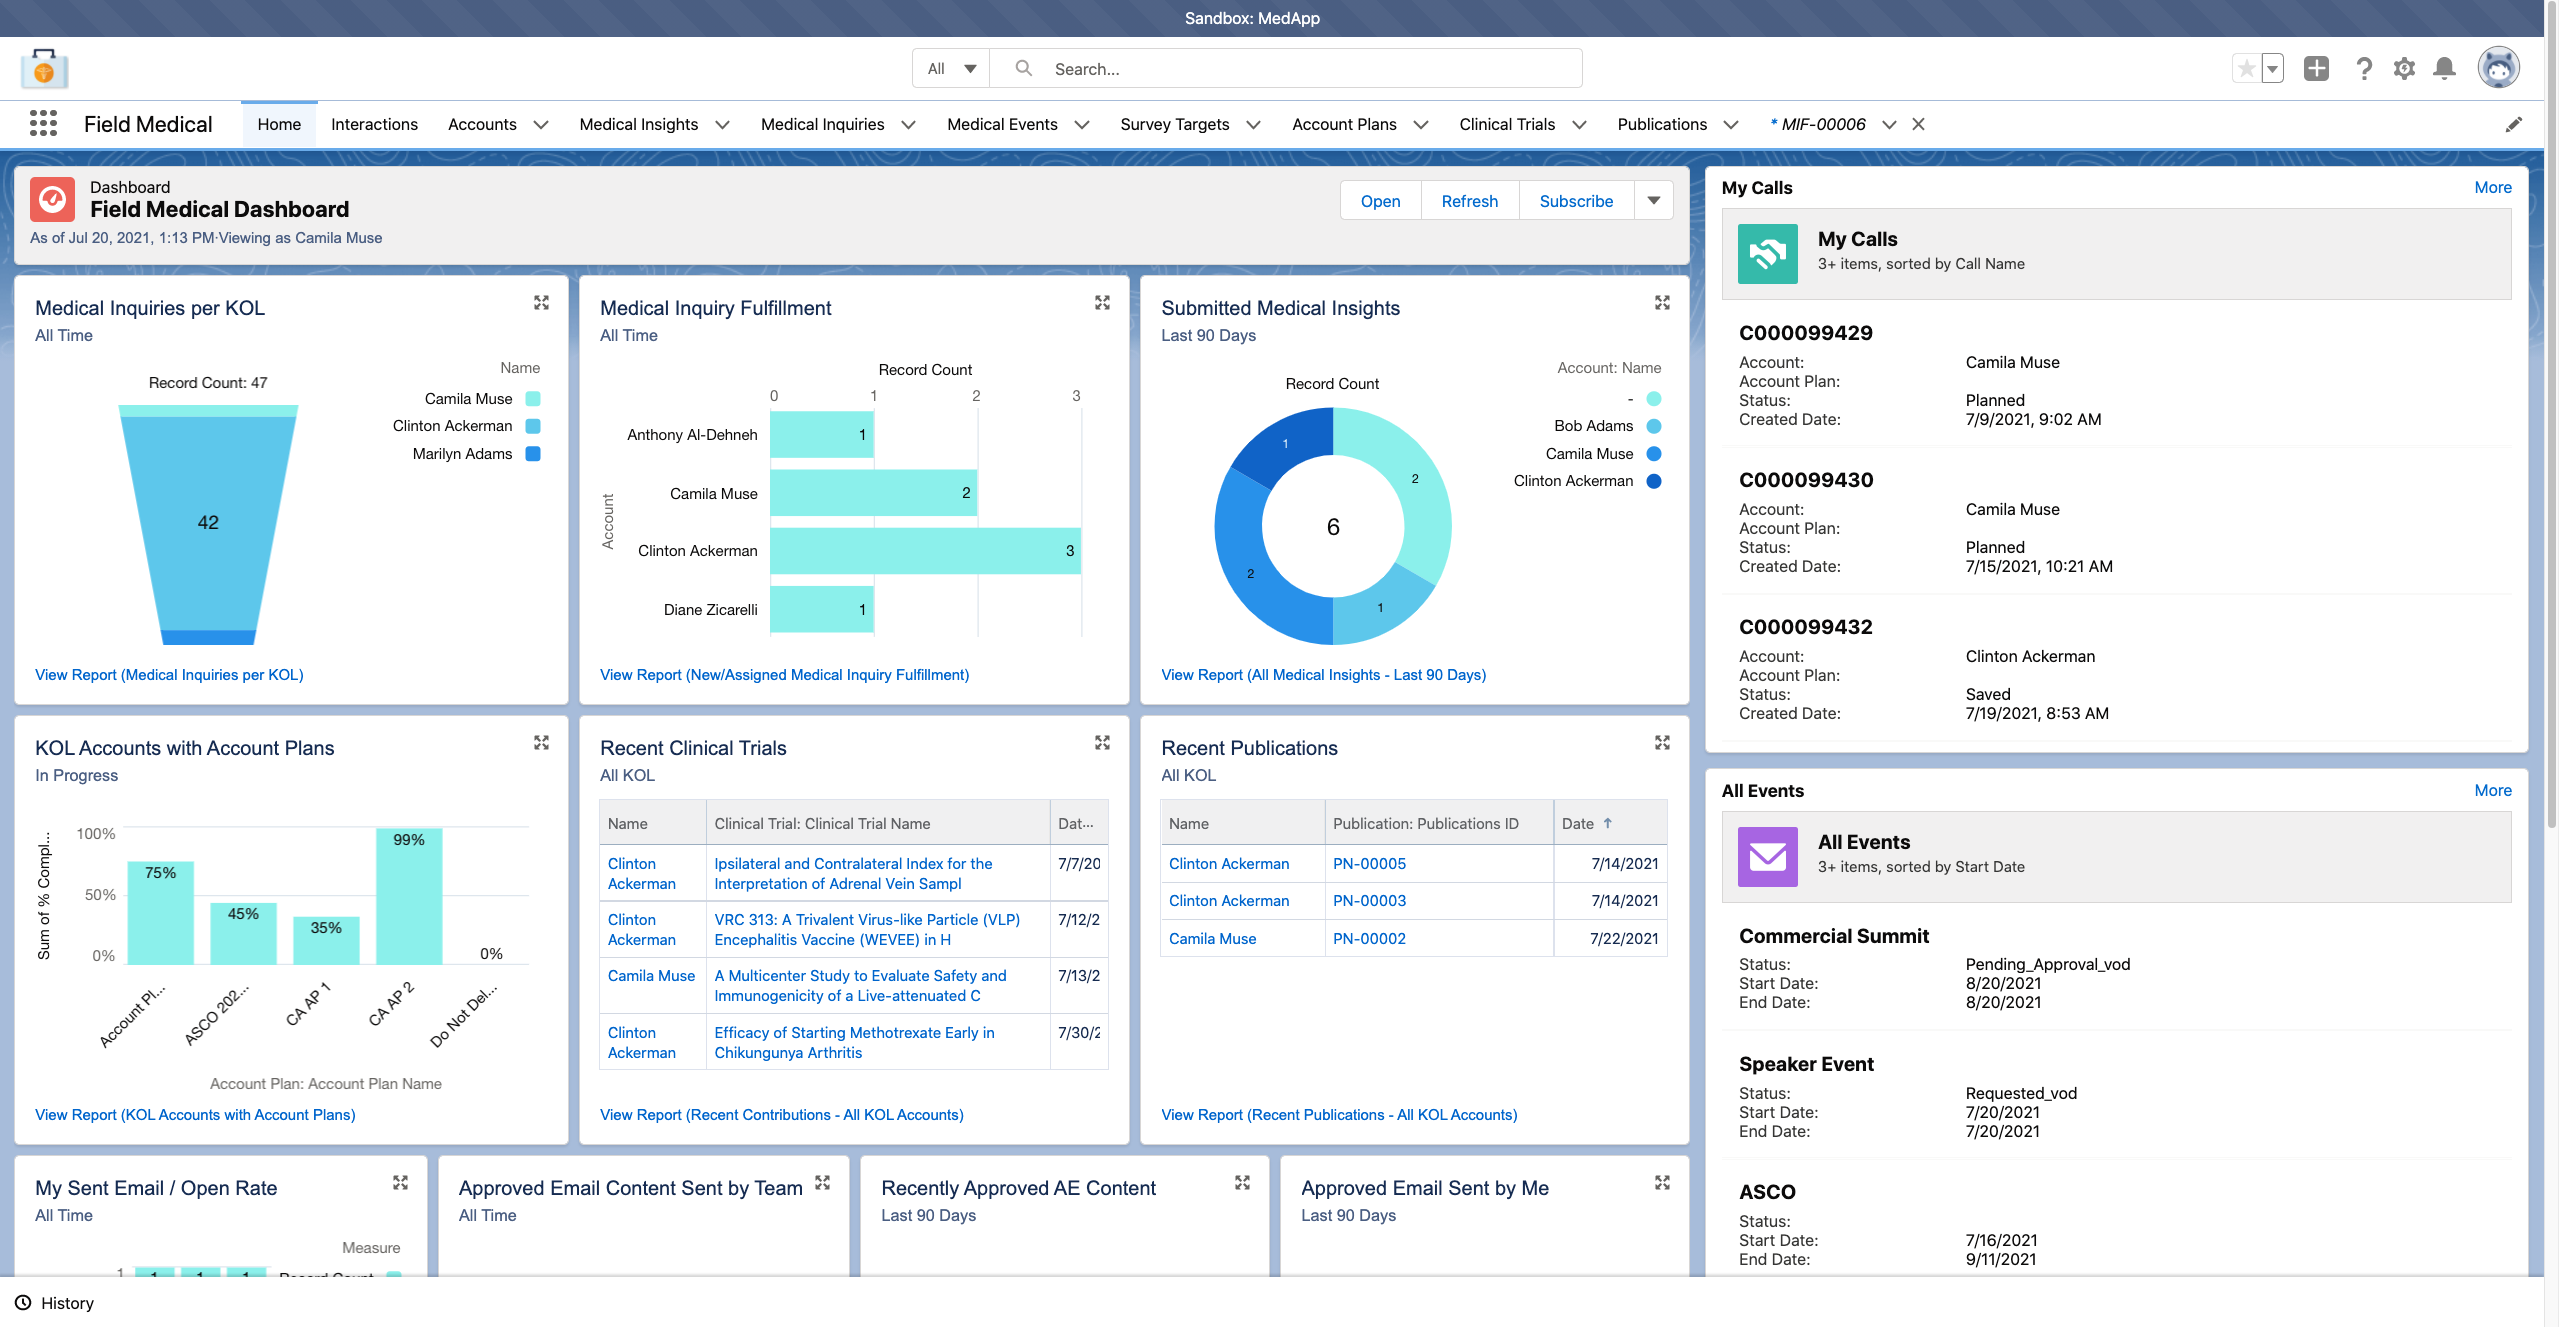
Field Medical Lightning Business App
The Field Medical App provides field medical users with access to the information they need, all in one place, where they can look up accounts, view interactions, research the latest information in publications and clinical trials, and access other medical-related information.
The MSL and MSL - Platform standard Veeva profiles must be present in the org (with or without users associated to them). If the profiles do not exist, admins can create them by cloning the Standard User profile for the MSL profile and the Standard Platform User profile for the MSL - Platform profile.
The Field Medical App includes the following tabs:
- Home - displays reports, dashboards, and interactions
- Interactions - displays calls, events, and medical events
- Accounts - displays KOL and all other account information
- Account Plans - displays My Account Plan, all account plans, account plans in progress, and rejected information
- Medical Insights - displays all medical insights and My Medical Insights
- Medical Inquiries - displays all medical inquiries, Medical Inquiries Created by Me, and unsubmitted medical inquiries
- Medical Inquiry Fulfilment - displays all MIFs, incomplete MIFs, and MIFs Assigned to Me
- Survey Targets - displays all open surveys, survey targets, and surveys that are expiring soon
- Publications - displays recent publications
- Clinical Trials - displays current clinical trials
Users are also able to view the following Lightning record pages from the Field Medical App:
- Account
- Account Plan
- Medical Insight
- Publications
- Clinical Trials
